Saturday, December 31, 2011

La Multi Ani!!! Happy New Year!!!

Share


La Multi Ani!!!

    La Multi Ani!  sa va bucurati de tot ce ati realizat in 2011 si sa intampinati 2012 cu multa incredere si speranta!


Happy New Year!!!

      Happy New Year! be happy for everything you've accomplished in 2011 and welcome 2012 with confidence and hope!


Sunday, December 25, 2011

Craciun Fericit!!! Merry Christmas!!!

Share


       Timpul nu a fost cel mai bun prieten al meu in ultima perioada de an, fapt pentru care nu am postat nimic de ceva timp; vreau sa va multumesc tuturor care m-ati vizitat si mi-ati scris in aceasta vreme, inseamna mult pentru mine! sper ca noul an sa-mi aduca putin din linistea de care am mare nevoie, sa pot sa ma concentrez pe ce iubesc cel mai mult, inclusiv pe blog! Nu am vrut sa treaca aceste zile fara sa scriu ceva si sa postez o poza cu bradutul nostru frumos :)
       Sarbatorile de iarna sunt speciale pentru mine in fiecare an, imi aduc bucurie in suflet si ma incanta de fiecare data ca pe un copil :) desi zapada inca nu ne-a onorat cu prezenta in Toronto, sper ca acolo unde sunteti in lumea asta sa aveti fulgi de nea si sa va bucurati cu adevarat de iarna! sa adulmecati mirosul bradului si al bucatelor alese pe care le-ati pregatit, sa cinstiti un pahar de vin si sa va bucurati de compania celor dragi! sa va umpleti inimile de bucurie si sufletele de liniste!  


                                                              Craciun Fericit!!!


English version
 
       Time wasn't my best friend recently, and that's why I haven't posted anything in a while now; I want to thank everyone for their visit and for everything you wrote to me, it means a lot to me! I hope that the new year will bring me the peace I need, to be able to focus on all the things I love, including my blog! I didn't want to let these days pass without writing something and posting a picture with my Christmas tree :)
       Winter holidays are special to me every year, they bring me joy as if I was a small kid :) though snow didn't want to be present in Toronto so far, I hope that wherever you are in this world you'll see some snow flakes and you'll truly enjoy winter! smell the tree and all the wonderful dishes you made, have a glass of wine,  and enjoy the company of your dear ones! fill your hearts with joy and your souls with peace! 


                                                            Merry Christmas!!!

Sunday, September 4, 2011

Salata de conopida cu maioneza (Cauliflower Salad with Mayonnaise)

Share

       Ce bine e sa pot posta din nou ceva bun, mi-a fost teribil de dor de toate blogurile si retetele minunate dar mai ales de toti cei care ma vizitati! viata mi-a rezervat niste schimbari lately, asa ca a trebuit sa tot aman activitatea pe blog :( vreau sa stiti insa ca am citit toate mesajele lasate, am incercat pe cat posibil sa va urmaresc si pot sa sa va spun ca am sa-mi dau silinta sa nu mai absentez atat de mult :)  am avut o vara incarcata pe toate planurile si am gatit destul de putin, dar tot am reusit sa mai fac cate ceva bun  :) promit sa recuperez timpul pierdut!
        Am zis ca e foarte potrivit sa postez reteta pentru salata de conopida, pe care sunt sigura ca toti o cunoasteti deja, doar e atat de simplu de preparat! nu e una dintre preferatele mele, dar atunci cand o prepar o mananc cu multa pofta :) Enjoy!
       It feels so good to be able to post something delicious again, I terribly missed all the lovely blogs and the mouth watering recipes, but most I missed all you wonderful people that visit me! life has reserved some changes for me lately so I had to keep delaying my blog activity :(  I want you to know though that I read all your messages and I tried to follow you as much as I could and I can only say that I promise to do my best and keep up with everything better :) I had a very complex summer on all levels and I barely cooked but I did make some delicious meals that I need to show you!
       I think it's the best moment to post my Cauliflower salad, which I'm sure you all know it by now, since it's so easy to make! it's not one of my favorites, but I do love it each time I prepare it :) Enjoy!


Ingrediente/Ingredients:     


 2 buc conopida/2 pcs of cauliflower
 1 ceapa/1 onion

 3 galbenusuri/3 egg yolks
 1 lingurita mustar/1 teaspoon with mustard
 300 ml ulei vegetal/300 ml vegetable oil
 sare, piper/salt, pepper
 suc de lamaie/lemon juice     


Cum se face/How it's made:  


Mai intai curatim conopida si o desfacem in buchetele mai mici si o fierbem in apa sarata cam 20 de minute.
We first clean the cauliflower and we break it in small bouquets and we boil it in salted water for 20 minutes.


Cand e fiarta o strecuram bine de apa si o zdrobim bine cu furculita sau cu un chopper.
When it's tender we drain it very well and we smash it with a fork or using a chopper.


O lasam sa se raceasca si facem maioneza din 3 galbenusuri, putina sare si mustar, adaugand treptat cate putin ulei la inceput, pentru a nu se taia. Continuam sa punem ulei pana cand am obtinut cata maioneza dorim, mie imi place mai multa.
We let the cauliflower cool and we start making the mayonnaise using 3 egg yolks, a pinch of salt and mustard, adding oil a little at a time. We continue adding oil until we obtain the amount of mayonnaise that we want, I usually want more.


Cand conopida s-a racit de tot o amestecam cu maioneza obtinuta si cu ceapa tocata, adaugam suc de lamaie dupa gust, sare, piper si servim. E super buna si extrem de rapid de facut si  perfecta ca aperitiv pentru petreceri! Bon appetit!
When the cauliflower has cooled completely, we combine it with the mayonnaise and chopped onion, we add some lemon juice according to taste, salt and pepper and we serve. It's delicious and so simple to make and goes perfectly as an appetizer for parties! Bon appetit!


Minunata/Lovely


Mai de aproape/Closer:


Thursday, August 4, 2011

Thai Cuisine: Stir Fry de porc, ardei si lemongrass (Stir Fried Pork with Peppers and Lemongrass)

Share

   
        E timpul pentru o noua reteta din bucataria thailandeza, de care eu m-am indragostit cumplit!!! de data aceasta am ales sa folosesc si lemongrass, o planta cu aroma de lamaie ce creste in Filipine si care este des folosita in mancarurile asiatice; eu am folosit lemongrass proaspat, dar se poate folosi si uscat sub forma de pudra. Carnea de porc cu ardei si lemongrass are un gust absolut superb iar pranzul nostru e gata in maxim 10 minute, ca de altfel toate mancarurile asiatice :)
       It's time for a new Thai recipe, a cuisine I'm totally in love with btw!!! this time I chose to use Lemongrass, a herb with a subtle citrus flavor that grows in Philippines and which is often used in Asian cuisine; I used it fresh, but it can also be used dried and powdered. Lunch is ready in 10 minutes and it's super tasty, like all Asian recipes for that matter :) Enjoy!


Ingrediente/Ingredients:  

 350 g carne de porc/350 g pork
 2 linguri sos de soia/2 tablespoons with soy sauce
 1 lingura zahar brun/1 tablespoon w brown sugar
 1/2 lingura pasta de ansoa/1/2 tablespoon w anchovy paste (fish sauce)
 1 lingurita amidon/1 teaspoon cornstarch
 1/2 lingurita sare/1/2 teaspoon w salt

 1/2 ceapa rosie/1/2 red onion
 2 catei de usturoi/2 garlic cloves
 2 ardei colorati/2 colored peppers
 1 tulpina lemongrass/1 lemongrass stalk
 2 fire ceapa verde/2 green onions

Cum se face/How it's made:


Mai intai facem marinada pentru carne. Intr-un vas mic punem sosul de soia, zaharul brun, pasta de ansoa, amidonul si sarea si amestecam foarte bine. Carnea o taiem fasii subtiri, o amestecam cu sosul si o dam la frigider pt 1 ora.
We first make the marinade for the meat. In a small bowl we combine soy sauce, brown sugar, anchovy paste, cornstarch and salt. We cut the pork in thin strips and we mix them well with the sauce. We marinate them for 1 hour in the fridge.


Curatam si tocam ceapa si usturoiul iar ardeiul il taiem fasii subtiri. Curatam lemongrass-ul si tocam marunt partea alba din mijloc.(il vedeti cum arata in imaginea cu ingredientele)
We peel and chop the onion and garlic and we cut the pepper in thin strips. We peel the lemongrass and we chop the middle part of the white part.(you can see it in the ingredients picture)


Incalzim wok-ul sau o tigaie mare si punem in o lingura de ulei ceapa si usturoiul tocat si le prajim la temperatura ridicata pt 1 minut.(stir fry)
We heat up 1 tablespoon with vegetable oil in a wok or a big skillet and we stir fry the onion with the garlic for 1 minute.


Adaugam ardei si lemongrass si continuam sa prajim pt alte 2 minute, amestecand mereu.
We add the pepper and lemongrass and we stir fry them together for 2 minutes.      


Adaugam carnea de porc marinata si prajim totul pana cand carnea e facuta, amestecand continuu.
We add the marinated meat and we stir fry everything until the meat is done. 


Cand carnea e gata, adaugam si ceapa verde tocata marunt, potrivim de sare si piper si mai prajim pt 2 minute.
When the meat is done we add the chopped green onion, we sprinkle salt and pepper if needed and we stir fry for another 2 minutes.


Servim cu garnitura de orez sau taitei de orez. Bon appetit!
We serve with rice as a side dish or rice noodles. Bon appetit!            


Super bun si se poate face si cu pui sau vita daca preferati!
Super tasty and it can also be made with chicken or beef if you like!


Mai de aproape.../Closer...


Thursday, July 28, 2011

Tort cu mousse de piersici, musetel si mure (Peach, Chamomile & Blackberry Mousse Cake)

Share


        Din cauza caldurii maxime ce a cuprins Toronto saptamana trecuta, cand s-au simtit si peste 49 grade Celsius, trebuie sa recunosc ca mi-a scazut de tot dorinta de a trebalui prin bucatarie, de aceea am lipsit putin de pe blog...dar I'm back now si cu ce altceva daca nu cu un tort super fin si aromat de vara ce te face realmente sa visezi! Desi pozele nu mi-au iesit tocmai bine, tortul a fost o minunatie, combinatia de arome este absolut divina!
        Because of the hot weather from last week, when in some days it felt like 49 degrees C, I have to admit that my desire to cook was pretty absent, that's why I didn't post anything for a while now...but I'm back now and what else could I post if not a gorgeous cake recipe, a very elegant and flavorful summer cake that makes you dream! though the pictures aren't really good, this cake was wonderful, the flavor combination is divine!

Ingrediente/Ingredients:

1 blat de tort din 3 oua pt o tava de 23 cm diametru, puteti vedea aici cum se face/1 sponge cake for a 23 cm round cake pan, you can see here how it's made

250 g mure/250 g blackberries
2 piersici/2 peaches
1 lingura flori de musetel/1 tablespoon with chamomile buds
60 ml apa/60 ml water
500 ml frisca lichida/500 ml liquid cream
20 g gelatina/20 g gelatine
80 g zahar/80 g sugar
fructe pt decor/fruits for decoration

Cum se face/How it's made:


Mai intai facem pandispanul din 3 oua. Il lasam sa se raceasca pe un gratar si ne apucam de mousse-uri.
Mousse-ul de piersici si musetel:
Fierbem 60 ml apa cu florile de musetel 2-3 minute.
We first make the sponge cake. We let it cool on a rack and we start making the mousses.
Peach and Chamomile mousse:
We simmer 60 ml water with the chamomile buds for 2-3 minutes.


Strecuram ceaiul obtinut si lasam sa se raceasca.
Curatam piersicile de coaja si le zdrobim cu un mixer vertical pana obtinem un suc gros.
We drain the tea and we let it cool.
We peel the peaches and we blend them with a vertical blender until we obtain a thick juice.


 Adaugam 40 g de zahar si ceaiul de musetel si amestecam. Dizolvam 10 g de gelatina conform instructiunilor de pe pachet si o incorporam in sucul de piersici.
We add 40 g sugar and the chamomile tea to the juice and we stir. We dissolve 10 g of gelatine according to the instructions on the package and we gently add it to the juice.


Mixam 250 ml frisca si cand frisca s-a intarit adaugam si sucul de piersici, amestecand usor cu o lingura. O dam la frigider pt 10 minute sa se intareasca putin.
We whip 250 ml of cream and when it's whipped we add the peach juice, gently stirring with a spoon. We place it in the fridge for 10 minutes so it thickens a little.  


Punem mousse-ul de piersici peste blatul de tort racit in tava in care l-am copt. Punem tava in frigider pana cand facem mousse-ul de mure.
We place the peach mousse on top of the sponge cake. We place it in the fridge until we make the blackberry mousse.


Mousse de mure:
 Zdrobim murele cu un mixer si sucul obtinut cu 40 de g zahar il punem la foc mic pentru 5 minute. Dupa aceea dam prin strecuratoare sosul pentru a indeparta samburii si adaugam cele 10 g de gelatina dizolvata si amestecam usor. Lasam sa se raceasca complet.
Blackberry mousse:
We smash the blackberries with the blender and we place the juice in a small pot on low heat, adding 40 g of sugar and we let it simmer for 5 minutes. After that we drain the juice using a sieve so we remove the seeds and we add the 10 g of gelatine already dissolved. We mix gently and we let it cool completely.


Mixam 250 ml frisca ramasa si cand e tare adaugam sosul de mure amestecand usor cu o lingura.
We whip the cream and when it's whipped we add the blackberry sauce gently mixing with a spoon.


Mousse-ul il punem deasupra in tava peste mousse-ul de piersici si nivelam frumos. Dam la frigider pentru 3-4 ore. Eu am ornat tortul simplu cu mure si piersici.
We pour the mousse on top of the peach mousse and we level it nicely. We place the cake in the fridge for 3-4 hours. I decorated the cake very simple with blackberries and peach.


O felie delicioasa si colorata/ A delicious and colorful slice:


Inca una/ One more


Mai de aproape :)/Closer :) Bon appetit!!!

Sunday, July 17, 2011

Frigarui de porc cu legume (Pork Skewers with Vegetables)

Share

 
        Nu am mai postat nimic cu carne de foarte multa vreme, si cum afara vremea ne permite sa ne desfasuram  in voie, m-am gandit ca ar fi momentul sa postez reteta de frigarui :) toata lumea face frigarui, simple, cu legume, cu tot felul de sosuri, mie personal imi plac cel mai mult cu legume, pentru o aroma mai frumoasa. Sunt o nebunie langa o sticla de bere si un pahar de vorba cu prietenii!
        I haven't posted anything with meat in a while now, and since outside the weather is perfect for us to barbecue, I thought it's time for me to post my meat Skewers recipe :) everybody likes skewers, plain, with vegetables or with different sauces; I personally like the vegetable and meat combination, for a more intense flavor. They're yummy with a cold bottle of beer while chatting with friends!

Ingrediente/Ingredients:

 carne de porc/pork
 ardei rosu/red pepper
 ardei verde/green pepper
 ceapa rosie/red onion
 ciuperci albe mici/small white mushrooms
 sos pt marinat/marinating sauce
 sare/salt
 bete/skewers


Cum se face/How it's made:


Taiem carnea cuburi 2-3 cm si o marinam cu sos facut in casa sau cumparat in cazul meu.
We cut the meat in 2-3 cm cubes and we marinate it with homemade sauce or bought in my case.


Curatam legumele si le taiem in patrate de marime similara cu carnea, lasam intregi ciupercile si ne apucam de asamblat frigaruile.
We wash and peel the vegetables and we cut them in cubes with similar in size to the meat, we leave the mushrooms whole and we start assembling the skewers.


Punem componentele pe bete si presaram sare/We place everything on skewers and we sprinkle with salt.


Incingem gratarul si punem frigaruile (se pot face si in casa in tigaie grilata sau in cuptor pe hartie de copt)
We heat up the grill and we place the skewers (you can make them indoors in a grill pan or in the oven on baking paper)

  
Gata prajite:/Grilled


Mai de aproape, mmmm, ce miros divin!!!/Closer, what an amazing smell!!!


Servim cu o bere rece langa :)/We serve with a cold bottle of beer :)  Bon appetit!


Wednesday, July 13, 2011

Focaccia cu usturoi si oregano (Garlic and Oregano Focaccia)

Share

        Chiar daca afara e foarte cald pofta e totusi gigantica, mai ales cand vad la altii pe blog :)) inspirata de reteta Ana Mariei de la Just Love Cookin', m-am apucat de dimineata sa pregatesc o focaccia minunata, care zic eu ca a iesit destul de bine pentru prima data :) a meritat cu varf si indesat sa suport cateva grade in plus in casa, doar ca sa simt pentru cateva minute mirosul incredibil ce venea din cuptor!!! OMG, deci e o reteta ce clar se potriveste cu sloganul blogului meu : Explore the flavour! God, daca ar exista device-uri pentru inregistratul mirosului, focaccia aceasta s-ar califica garantat pentru testare :))) va provoc sa riscati o ora dimineata pentru aceasta minunatie care va va deschide usa spre paradisul aromelor, da ati inteles bine, doar o ora cu totul, e super rapid procesul cu un rezultat ce mie mi-a depasit asteptarile! Sa vedem cum se face, eu am adaptat usor reteta dupa gustul meu :)
        Even though it's hot outside I'm  still craving for some things, even more when I see stuff on blogs :) inspired by Ana Maria's recipe from Just Love Cookin', in the morning I started making a wonderful Focaccia Bread, which I dare to say turned out pretty good for my first time :) the degrees in the house were well worth compared to the smell that came from the oven!!! OMG, this is a recipe that fits my blog's motto: Explore the flavor! God, if there were any devices for recording the smell, this Focaccia would certainly qualify for testing :))) I dare you all to take one hour in the morning and prepare this yummyness which will open the door to the  paradise of flavors, yes, you read correctly, just an hour, it's super fast with a result that really exceeded my expectations! Let's see how it's made, I slightly adapted the recipe according to my own taste :)


Ingrediente/Ingredients:

500 g faina/500 g all purpose flour
300 ml apa carbogazoasa/300 ml carbonated water
25 g drojdie proaspata/25 g fresh yeast
40 ml ulei de masline/40 ml olive oil
1 lingurita sare/1 teaspoon with salt
1 lingurita zahar sau miere/1 teaspoon with sugar or honey
3 catei usturoi/3 garlic cloves
oregano/oregano 

Cum se face/How it's made:   

Incalzim apa cat sa fie calduta si dizolvam drojdia si zaharul in ea, apoi adaugam si uleiul de masline si amestecam. Turnam lichidul in bolul cu faina amestecata cu sare si usturoi zdrobit.
We heat the water so it's lukewarm and we dissolve the yeast and sugar, and we add the olive oil, mixing them. We pour the liquid in the bowl with flour mixed with salt and crushed garlic.


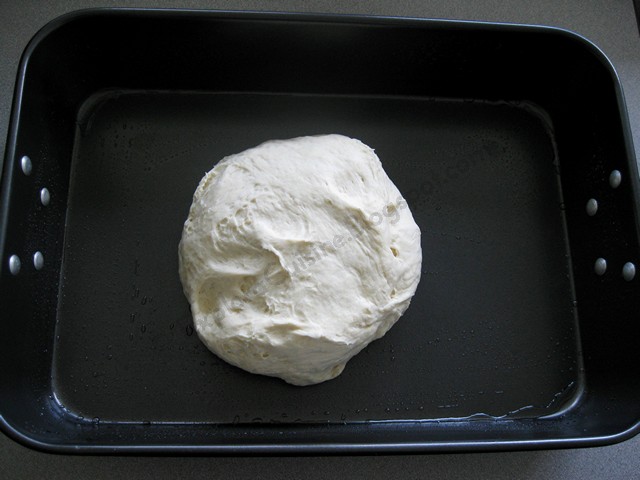
Framantam aluatul pana se desprinde usor de pe degete aproximativ 10 minute. Chiar daca el va fi destul de moale, rezistati tentatiei de a adauga faina. Rasturnam aluatul intr-o tava mare unsa cu ulei.
We knead the dough until it comes out of our fingers around 10 minutes. Though the dough will be pretty soft, resist the tentation of adding more flour. We place the dough in a big oiled pan.


Intindem aluatul cu degetele dupa forma tavii, apasand usor fara a trage de el. Lasam sa creasca pentru 30 de minute pana isi dubleaza volumul.
We flatten the dough with our fingers following the shape of the pan, without pulling it. We let it rise for 30 minutes, until the dough doubles its volume.


Dupa 30 de minute, facem mici gauri in aluat cu degetele (dezumflam aluatul), apasand pana la fundul tavii. Ungem aluatul cu un mix de 3 linguri ulei de masline+3 linguri apa.(se adauga apa, pentru ca gaurile sa ramana albe dupa coacere). Presaram sare de mare deasupra si oregano, sau alte mirodenii dupa plac: rozmarin, cimbru, busuioc, etc.
After 30 minutes, using our fingers we make holes in the dough (flattening the dough), pressing till the bottom of the pan. We grease the dough with a mixture of 3 tablespoons with olive oil + 3 tablespoons with water.(we add water so the holes will remain white after baking). We sprinkle some sea salt on top and oregano or other spices, according to your own taste like rosemary, thyme, basil, etc...     


Lasam aluatul sa creasca inca 30 de minute. Dupa ce a crescut introducem tava in cuptorul preincalzit la 205 grade pentru 25 de minute, cand e frumos rumenita deasupra. O scoatem pe un gratar sa se raceasca.
We let the dough rise for another 30 minutes. After that we place the pan in the preheated oven at 410 degrees for 25 minutes, when it's golden brown on top.  We remove it from the pan and we place it on a rack to cool.


Taiem felii si servim, nu va zic cu ce, ca merge cu orice, chiar si goala! Bon appetit!
We slice and serve, I won't say with what, because it goes with anything, even plain as it is! Enjoy!


Mirosul era atat de frumos incat cu greu m-am rabdat sa o las sa se raceasca :)
The smell was that lovely that I barely waited for the slices to cool :)


Fellile erau frumos crescute si delicioase!
The slices were puffy and delicious!


Mai de aproape.../Closer...  

   
Related Posts Plugin for WordPress, Blogger...