Share
Nu cred ca sunt legume pe care sa le iubesc mai mult decat ciupercile, micutele palarii aromate ce dau o savoare deosebita oricarui tip de mancare! Noua personal cel mai mult ne plac ciupercile marinate, obisnuiam sa cumparam de la deli bar din supermarket cu vreo 3$ suta de grame, desi destul de scumpe sunt delicioase, problema este insa ca nu se gasesc in toate supermarketurile aici; nu pun la socoteala cele la borcan pe care le gasim peste tot pentru ca nu se pot compara deloc!
Tot cautand o reteta pentru ciupercile acestea gustoase, am gasit reteta care imi place la Mary de la One Perfect Bite si nu pot decat sa-i multumesc inzecit in numele meu si al sotului meu, pentru ca le adoram!!! Sunt zemoase, usor acrisoare cu aroma de usturoi si oregano, atat de bune ca nu te poti opri din mancat! Merg perfect ca salata langa friptura sau ca aperitiv (Antipasto) la mese festive, sau de ce nu, la un picnic langa niste branza, mmmm, senzational! pentru cei care sunteti fani ciuperci va recomand calduros sa le incercati, veti fi vrajiti cu adevarat :)
I don't think there are any vegetables that I love more than mushrooms, the little caps that bring flavor to any prepared meal you can think of! We personally love best marinated mushrooms, we used to buy them at the deli bar in the supermarket with 3$ for 100 g, though pricey they're delicious, the only problem is that we can't find them in all supermarkets here; I'm not counting the ones you find in jars everywhere since you can't compare their taste!
Browsing the web for the perfect recipe, I found what I was looking for at Mary's from One Perfect Bite, who I can only thank a hundred times, because we just adore the mushrooms! they're moist, a little bit sour and beautifully flavored from garlic and oregano, so yummy that you just can't stop eating! you can serve them as a salad next to steak, or as an appetizer (Antipasto) for special dinners, or why not, eat them at a nice picnic with cheese, mmmm, awesome! for those of you that love mushrooms this recipe is a must, I truly recommend it and believe me when I tell you that you'll be charmed forever :)
Nota/Note: eu am facut din 750 g ciuperci, reteta de mai jos e pentru 500 g/I used 750 g mushrooms, the recipe from below is for 500 g mushrooms
Ingrediente/Ingredients:
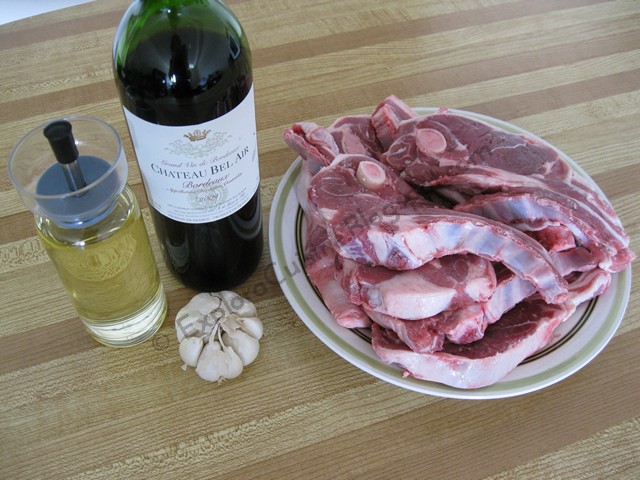
500 g ciuperci Champignons/500 g white mushrooms
1 ceapa/1 onion
3 catei usturoi/3 garlic cloves
130 ml ulei de masline/130 ml olive oil
70 ml otet/70 ml white vinegar
1/2 lingta sare/1/2 teaspoon with salt
1 varf de zahar/1 pinch of sugar
1 varf piper/1 pinch of pepper
1/2 lingta oregano/1/2 teaspoon with oregano
Cum se face/How it's made:
Curatam ciupercile si le spalam bine--data viitoare voi face reteta cu mai multe tipuri de ciuperci pentru mai multa savoare!/We clean and wash the mushrooms--next time I'll try the recipe with more types of mushrooms for enhanced flavor!
Fierbem ciupercile in apa sarata pentru 10 minute, pana cand se inmoaie putin. Cand sunt gata, le scurgem de apa si le punem intr-un recipient.
We simmer the mushrooms in salted water for 10 minutes, until they are tender. When they're tender we drain the water and we place them in a bowl.
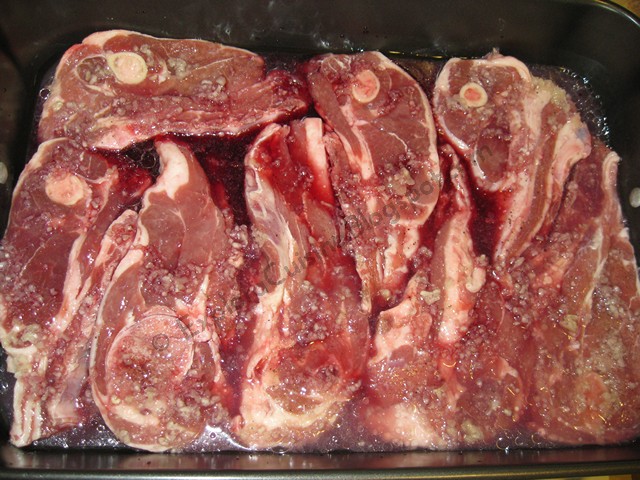
Intr-un recipient punem ciupercile, uleiul, ceapa tocata, usturoiul zdrobit si celelalte ingrediente si le amestecam bine.
In a container we place the mushrooms, oil, vinegar, the chopped onion and crushed garlic and the other ingredients and we stir everything.
Punem capac si lasam in frigider pana a doua zi sa se marineze, minim 24 de ore preferabil. Cu cat lasam mai mult cu atat vor fi mai gustoase. Servim cu pofta la micul dejun sau la cina langa branza, masline, sunca, etc.
We cover the container and we place it in the fridge to marinate overnight, 24 hours is preferable. The longer it stays in the fridge the tastier they'll get. We serve them for breakfast or dinner next to cheese, olives, ham, etc.
Sunt dementiale, trebuie sa le incercati! o sa va atraga ca magnetul pana cand vor fi gata :)) Bon appetit!
They're amazing, you gotta try them! they'll attract you like a magnet until they'll be finished :)) Enjoy!
Showing posts with label reteta pas cu pas (reteta step by step). Show all posts
Monday, July 11, 2011
Monday, April 25, 2011
Friptura de miel traditionala (Traditional Roast Lamb)
Share
Please scroll down for English version
Luna aceasta Dulce Romanie a fost gazduit de Mimmi de la Bucate pe alese, care a propus 2 ingrediente potrivite pentru sarbatoarea de Paste: mielul si mierea. Cum eu nu sunt un fan miere si o folosesc destul de rar, o sa particip cu reteta de friptura de miel, clasica, probabil multi dintre voi o preparati la fel :)
Chiar daca nu gatesc foarte des miel, de Paste aceasta friptura e traditionala acum la noi in casa, zic asta pentru ca in trecut nu puteam suferi nici mirosul macar, dar dupa cum vedeti gusturile se schimba cu timpul :) Din cand in cand mai prepar o tocanita de miel cu cartofi (reteta mea) sau ciorba de miel cu macris, aceasta din urma e putin mai dificila, caci nu gasesc macris pe aici, sau nu stiu sa caut :))).Dar sa revenim la reteta...Eu nu am marinat carnea caci nu am rabdarea necesara, dar daca doriti o puteti lasa in vin cu condimente vreo 6 ore inainte de a pune la cuptor. Daca stiti vreo reteta deosebita cu carne de miel, va rog sa lasati un comment cu mai multe detalii :) Si acum sa incepem...
Ingrediente:
1,5 kg carne de miel pentru friptura
6-7 catei usturoi
300 ml vin rosu
putin ulei
sare, piper
Cum se face:
Mai intai spalam carnea foarte bine, absorbim apa de pe ea si o condimentam dupa preferinta, mie imi place simpla, ca sa iasa in relief mai bine gustul carnii.
Intr-o tava mare, punem 2 linguri de ulei si asezam carnea.
Zdrobim usturoiul , adaugam vreo 3-4 linguri de apa, amestecam si turnam peste carne din loc in loc.
Deasupra turnam 200 ml vin rosu si 2 pahare de apa.
Acoperim tava cu capac (sau foaie de staniol) si introducem tava in cuptorul preincins la 200 grade pentru primele 30 minute, dupa care reducem temperatura la 190 grade si lasam aproximativ 1 ora.
Este indicat sa verificati din 30 in 30 minute carnea, sa vedeti daca mai e nevoie de apa.
Punem inca 100 ml vin pe final, cand carnea este aproape gata.Mai lasam 15 minute.
Luam capacul jos si lasam sa se rumeneasca pt 5 minute.
Scoasa din cuptor:
Carnea este frageda, suculenta pe interior si usor rumenita pe exterior, exact asa cum trebuie :)
Noi am servit cu garnitura de cartofi piure si salata de cruditati.
Cartofii se vad frumos, piureul il face de obicei sotul meu, ii iasa superb :)
Si carnea mai de aproape...
Din alt unghi :)
Sper ca ati avut niste Sarbatori Pascale frumoase cu cei dragi langa voi!
English version
This month Dulce Romanie was organised by Mimmi from Bucate pe alese, who suggested 2 ingredients, appropriate for Easter I would say: lamb and honey. Since I'm not a huge fan of honey which I use rarely, I'll participate with my roast lamb recipe, classic, probably many of you make it the same way :)
Even though I don't cook lamb very often, on Easter, this roast lamb is traditional these days in our home, I'm saying these because in the past I couldn't even stand the smell of lamb, but as you can see taste changes in time :) From time to time I make lamb stew (my recipe) or a lamb soup with watercress, the soup is a little more difficult to make since I can't find watercress, or I don't know where to look for it :))). Back to the recipe...I didn't marinate the meat since I don't have the necessary patience, but if you want to marinate it, you can leave the meat with some red wine and spices to sit for 6 hours before you cook it. If you have any favorite recipes for lamb, please feel free to leave a comment with more details :) And now let's begin...
Ingredients:
1,5 kg lamb for roasting
6-7 garlic cloves
300 ml red wine
some oil
salt, pepper
How it's made:
We first wash the meat very well, and we absorb the water with paper towels and we spice it up by taste, I like it simple so the lamb flavour is really intense.
In a bis roasting pan we pour 2 tablespoons of oil and we place the spiced meat.
We crush the garlic and we mix it with 3-4 tablespoons of water and we pour it on top of the meat from place to place.
We pour 200 ml of red wine and 2 glasses of water, we add more salt, we cover the pan with a lid or with foil and we place the pan in the preheated oven at 400 degrees for 30 minutes, after which we reduce the temperature to 380 degrees for another hour.
I recommend you check the meat from time to time for tenderness, to add more water if it's necessary, or to reduce the temperature.
We pour another 100 ml of wine when the meat is almost done. We leave it another 15 minutes.
When the meat is tender, we remove the lid and we let it roast nicely for 5 minutes.
Fresh from the oven:
The meat is tender, juicy on the inside and a little bit crisp on the outside, exactly like it should be :)
We served the lamb with mashed potatoes, made by my husband, who makes the best mashed potatoes in the world :)
Hope you had a wonderful Easter! (for those of you who celebrate Easter)
Sunday, March 27, 2011
Terina de porc infasurata in bacon (Pork Terrine Wrapped in Bacon)
Share
Please scroll down for English version
Cum in weekend am avut chef de gatit, am incercat terina de porc infasurata in bacon, inspirata fiind de o reteta dintr-o carte de bucate de-a mea. Terina reprezinta un chec de carne facut din carne taiata sau macinata, copt in cuptor ce se serveste la temperatura camerei; denumirea de "terrine" vine de la vasul ceramic de forma dreptunghiulara in care se gateste checul de carne. De data aceasta am incercat o reteta simpla, dar cu siguranta voi incerca si alte variatiuni ce contin ficat sau nuci, etc... Sper sa va placa!
Ingredients:
1 kg carne de porc tocata
felii de bacon (eu am pus vreo 16)
2 cepe
4 catei usturoi
2 oua
2 felii de paine
patrunjel verde
oregano proaspat
sare, piper
Cum se face:
Intr-un bol amestecam carnea tocata cu ceapa tocata, usturoiul zdrobit, ouale, painea maruntita, verdeata tocata si condimente si amestecam bine, formand o pasta similara cu cea pentru chiftele.
Intr-o tava dreptunghiulara mica asezam felii de bacon pe peretii formei lasand sa atarne cate o bucata de vreo 6 cm pe laturi, ca mai jos:
Asezam pasta de carne peste bacon, o apasam cu o lingura si nivelam frumos.
Dupa ce nivelam frumos carnea, acoperim cu fasiile de bacon care atarnau si avem grija sa fie bine acoperit (daca e nevoie mai punem deasupra niste bacon)
Acoperim forma de chec cu foaie de staniol si o plasam intr-o tava mai mare pe care o umplem cu apa fierbinte ce ajunge pana la jumatatea formei de chec si introducem in cuptorul preincalzit la 170 grade (aveti grija sa nu va ardeti cu apa fierbinte) si lasam timp de 1 ora si 45 minute sa stea la bain marie.
In felul acesta terina nu se va rumeni. Daca vreti sa se rumeneasca putin deasupra, puteti lasa 5 minute fara folie pe pozitia grill. Terina este gata atunci cand bagati o scobitoare in centrul checului si sucurile care ies sunt clare. Cand e gata se scoate cu grija forma din tava si scurgem toata zeama ce s-a format si lasam sa se raceasca putin.
Acoperim tava din nou cu folie si plasam deasupra niste greutati care sa preseze terina. (e bine daca aveti o alta forma de chec similara in care sa puneti niste conserve, sau alte greutati)
Lasam sa se raceasca iar apoi o punem in frigider cu tot cu tava cu conserve, sa se preseze foarte bine. E de preferat ca tava sa stea la frigider cel putin 6 ore, sau peste noapte.
Cand o scoatem din frigider o rasturnam pe un platou si o taiem felii.
Servim cu salata de cruditati, sau cu diverse sosuri dupa preferinte. Merge perfect la micul dejun sau o cina usoara. Bon appetit!
Mai de aproape...Delicios!
English version
In the weekend I was in the mood of cooking, so I tried the Pork terrine wrapped in bacon, inspired by a a recipe that I found in one of my books. Terrine is a forcemeat loaf cooked in the oven that you serve at room temperature. The name "terrine" comes from the ceramic dish in which the loaf is usually made. This time I tried a simple recipe, but I'll definitely try out some other variations of terrine in the future, some with nuts, or liver, etc...Hope you enjoy!
Ingredients:
1 kg lean ground pork meat
bacon strips (I've put like 16)
2 onions
4 garlic cloves
2 eggs
2 slices of bread
fresh parsley
fresh oregano
salt, pepper
How it's made:
In a large bowl we mix together the ground pork meat, the chopped onion, crushed garlic, the crumbled bread, eggs, spices, chopped parsley and oregano, obtaining a paste similar to the one that we use to make meatballs. Make sure you use enough salt.
In a rectangular tin, we place the bacon strips on sides nicely, to cover the tin, leaving 6 cm from each strip to hang over the side of the tin, like I did:
We place the meat in the tin and we press it down and we level it.
We cover the meat with the bacon strips nicely, making sure that is fully covered (you can use additional bacon on top if it's necessary).
We place the tin in a bigger pan, we cover it with foil, we pour hot water in the pan half way up of the tin, and We place the pan in the preheated oven at 345 degrees for 1 hour and 45 minutes (the meatloaf will not fry using the bain marie method; if you want it to be golden brown on top, you can use the grill position for 5 minutes at the end) without the foil on the tin.
The terrine is ready when a wooden toothpick inserted in the middle comes clean and the juices are clear.
We remove the pan from the oven and let it cool down a little bit.
Very carefully we remove the tin and we pour the water from the tin in the sink.We put the foil back on the top and we place another tin filled with full cans so the terrine is pressed. We leave it to cool off and we place it in the fridge for at least 6 hours (we leave the heavy tin on top)
We remove it from the fridge and we place it upside down on a plate.
We slice and serve at room temperature with a fresh salad or pickled vegetables, or different sauces.
Bon appetit!
Tuesday, March 22, 2011
Tort egiptean (Egyptian Cake)
Share
Astazi este o zi speciala pentru mine fiindca eu si sotul meu sarbatorim 4 ani de cand ne-am casatorit!!! Poate unora li se pare mult, pentru noi insa a trecut foarte repede acest timp, am trait multe experiente frumoase si o iubire cum sper sa cunoasteti toti in viata aceasta, iubire pentru care ii multumesc lui Dumnezeu in fiecare zi!
Cum sotului meu i-a placut acest tort, am zis ca e o foarte buna ocazie sa il refac de ziua noastra :) Reteta este preluata de pe blogul Amaliei, careia ii multumesc!
Today is a special day for me because me and my husband celebrate 4 years of marriage!!! Maybe for some people that's a lot of time, but for us that time just flew so fast, we shared a lot of beautiful experiences and a true love, a love that I wish all of you will know in this life, a love that I thank God every day for it!
Ingrediente/Ingredients:
Pt o foaie (ne trebuie 3 foi)/For a layer(we need 3):
2 albusuri/2 egg whites
2 linguri zahar/2 tablespoons sugar
0.5 linguri faina/0.5 tablespoons flour
40 g alune macinate/40 g ground hazelnuts (cashews)
Pt crema 1/For cream number1:
6 galbenusuri/6 egg yolks
6 linguri zahar/6 tablespoons sugar
340 ml lapte/340 ml milk
2 linguri faina/2 tablespoons flour
170 g unt (la temp camerei)/170 g butter (at room temperature)
vanilie/vanilla
Pt crema 2/For cream number 2:
250 ml frisca lichida/250 ml cream
150 g zahar/150 g sugar
120 g alune zdrobite bucati mai mari/120 g chopped hazelnuts
Pt decor/For decorating:
250 ml frisca/250 ml cream
50 g ciocolata alba/50 g white chocolate
picaturi de zahar ars/caramel drops
Cum se face/How it's made:
Mai intai ne ocupam de foi. Maruntim 40 g nuci caju pentru prima foaie.
We start making the cake sheets. We mince 40 g of nuts very well.
Separam 2 albusuri de galbenusuri si batem albusurile spuma cu 2 linguri zahar. Adaugam alunele macinate amestecate cu faina si incorporam in bezea.
We separate the egg yolks from the egg whites and we beat the egg whites very well, adding the sugar one tablespoon at a time. We add the minced nuts mixed with the flour, folding them in the batter.
Tapetam fundul unei tavi de copt cu diametrul de 24 cm cu hartie de copt (eu am pus staniol, dar va sugerez hartia de copt sa nu se lipeasca foile) si nivelam bezeaua pe forma. Punem in cuptorul preincins la 160 grade pentru 20-25 minute.
Intre timp, spalam ustensilele si ne apucam de a doua foaie, in total sunt 3 foi.
We put baking paper on the bottom of a 24cm round cake pan and we add the batter, flattening it nicely.
Scoatem din cuptor prima foaie si o punem pe a doua.
When the first sheet is done, we take it out of the oven and we place the second one in.
Dupa ce am terminat cu foile si le-am pus la racit pe un gratar, ne apucam de crema 1.
Amestecam intr-un vas galbenusurile cu zaharul.
When the cake sheets are done, we start preparing cream number 1:
Adaugam peste galbenusuri laptele si faina si lasam sa fiarba la foc mic, amestecand continuu.
We add the flour and the milk and we place the pot on low heat, stirring continuously.
Crema se va ingrosa treptat pana va deveni ca o budinca.
The cream will start to thicken like a pudding.
Luam de pe foc si lasam sa se raceasca complet. Consistenta cremei va fi asa:
We leave it aside, until it cools off completely. It will look like this:
Mixam untul intr-un bol putin si adaugam cate o lingura din crema de vanilie treptat si mixam, la sfarsit adaugand vanilie.
In a bowl, we beat the butter a little bit and we add one tablespoon at a time from the cooled vanilla cream, until we obtain a nice cream (we add vanilla at the end)
Crema obtinuta o dam la frigider pana ne ocupam de a doua, timp in care se va intari putin.
We place the bowl in the fridge until we finish cream number 2.
Acum ne apucam de crema 2.
Topim zaharul pe foc mic, pana se caramelizeaza frumos, fara a se arde, si il turnam in strat subtire pe o foaie de copt.
Lasam zaharul ars sa se raceasca, il rupem bucati si il punem intr-o punga mare care se sigileaza si il batem bine cu sucitorul (cu cat sunt mai mici cu atat e mai bine)
We let it cool down and we take the pieces and place them in a zipper bag. We close the bag and beat the sugar pieces with a a heavy tool, until it's broken in small pieces, the smaller the better.
Zaharul ars zdrobit: (eu am luat cateva "picaturi" mai mari pentru decor)
I've taken some bigger pieces for decorating the cake.
Intr-un bol mixam frisca foarte bine si adaugam alunele zdrobite si zaharul ars.
Crema 2 este gata:
Cream number 2 is finished:
Scoatem crema 1 de la frigider si ne apucam de asamblat. Foaie + 1/3 crema 1 + 1/3 crema 2, foaie, etc.
Punem o foaie pe un platou si peste intindem 1/3 din crema 1.
We can start assembling the cake following this rule: 1 sheet of cake, 1/3 of cream no 1, 1/3 of cream no 2, and so on...
We place a cake sheet on a big plate and we put 1/3 of cream no 1 on top.
Intindem 1/3 din crema 2 peste:
We place 1/3 of cream no 2 above:
Repetam actiunea pana cand terminam cu stratul din crema 2.
We repeat these layers until we finish with cream no 2 on top.
Batem optional 250 ml frisca si intindem deasupra. Razuim ciocolata alba si punem picaturile de zahar ars.
We whip the other 250 ml of cream (optional) and we decorate the cake with it, adding white shredded chocolate and "tears" of caramel on top.
Tortul frumos decorat il dam la frigider pentru minim 6 ore, timp in care zaharul ars se va topi in crema.
Sectiune si felie pentru voi:
A section for you:
Si o felie delicioasa de tort ca sa sarbatorim :) Bon appetit si sa fiti iubiti!
Astazi este o zi speciala pentru mine fiindca eu si sotul meu sarbatorim 4 ani de cand ne-am casatorit!!! Poate unora li se pare mult, pentru noi insa a trecut foarte repede acest timp, am trait multe experiente frumoase si o iubire cum sper sa cunoasteti toti in viata aceasta, iubire pentru care ii multumesc lui Dumnezeu in fiecare zi!
Cum sotului meu i-a placut acest tort, am zis ca e o foarte buna ocazie sa il refac de ziua noastra :) Reteta este preluata de pe blogul Amaliei, careia ii multumesc!
Today is a special day for me because me and my husband celebrate 4 years of marriage!!! Maybe for some people that's a lot of time, but for us that time just flew so fast, we shared a lot of beautiful experiences and a true love, a love that I wish all of you will know in this life, a love that I thank God every day for it!
Since my husband loved this cake, I thought it's a good occasion to do it for our anniversary :)
Ingrediente/Ingredients:
Pt o foaie (ne trebuie 3 foi)/For a layer(we need 3):
2 albusuri/2 egg whites
2 linguri zahar/2 tablespoons sugar
0.5 linguri faina/0.5 tablespoons flour
40 g alune macinate/40 g ground hazelnuts (cashews)
Pt crema 1/For cream number1:
6 galbenusuri/6 egg yolks
6 linguri zahar/6 tablespoons sugar
340 ml lapte/340 ml milk
2 linguri faina/2 tablespoons flour
170 g unt (la temp camerei)/170 g butter (at room temperature)
vanilie/vanilla
Pt crema 2/For cream number 2:
250 ml frisca lichida/250 ml cream
150 g zahar/150 g sugar
120 g alune zdrobite bucati mai mari/120 g chopped hazelnuts
Pt decor/For decorating:
250 ml frisca/250 ml cream
50 g ciocolata alba/50 g white chocolate
picaturi de zahar ars/caramel drops
Cum se face/How it's made:
Mai intai ne ocupam de foi. Maruntim 40 g nuci caju pentru prima foaie.
We start making the cake sheets. We mince 40 g of nuts very well.
Separam 2 albusuri de galbenusuri si batem albusurile spuma cu 2 linguri zahar. Adaugam alunele macinate amestecate cu faina si incorporam in bezea.
We separate the egg yolks from the egg whites and we beat the egg whites very well, adding the sugar one tablespoon at a time. We add the minced nuts mixed with the flour, folding them in the batter.
Tapetam fundul unei tavi de copt cu diametrul de 24 cm cu hartie de copt (eu am pus staniol, dar va sugerez hartia de copt sa nu se lipeasca foile) si nivelam bezeaua pe forma. Punem in cuptorul preincins la 160 grade pentru 20-25 minute.
Intre timp, spalam ustensilele si ne apucam de a doua foaie, in total sunt 3 foi.
We put baking paper on the bottom of a 24cm round cake pan and we add the batter, flattening it nicely.
We place it in the preheated oven at 320 degrees for 20-25 minutes.
Meanwhile we wash our kitchen tools and start making the second sheet, they're 3 sheets total.
Scoatem din cuptor prima foaie si o punem pe a doua.
When the first sheet is done, we take it out of the oven and we place the second one in.
Dupa ce am terminat cu foile si le-am pus la racit pe un gratar, ne apucam de crema 1.
Amestecam intr-un vas galbenusurile cu zaharul.
When the cake sheets are done, we start preparing cream number 1:
We mix the 6 egg yolks with the sugar.
Adaugam peste galbenusuri laptele si faina si lasam sa fiarba la foc mic, amestecand continuu.
We add the flour and the milk and we place the pot on low heat, stirring continuously.
Crema se va ingrosa treptat pana va deveni ca o budinca.
The cream will start to thicken like a pudding.
Luam de pe foc si lasam sa se raceasca complet. Consistenta cremei va fi asa:
We leave it aside, until it cools off completely. It will look like this:
Mixam untul intr-un bol putin si adaugam cate o lingura din crema de vanilie treptat si mixam, la sfarsit adaugand vanilie.
In a bowl, we beat the butter a little bit and we add one tablespoon at a time from the cooled vanilla cream, until we obtain a nice cream (we add vanilla at the end)
Crema obtinuta o dam la frigider pana ne ocupam de a doua, timp in care se va intari putin.
We place the bowl in the fridge until we finish cream number 2.
Acum ne apucam de crema 2.
Topim zaharul pe foc mic, pana se caramelizeaza frumos, fara a se arde, si il turnam in strat subtire pe o foaie de copt.
We start making cream no 2:
We caramelize the sugar in a pot and we pour it in a thin layer on a baking paper sheet.
Lasam zaharul ars sa se raceasca, il rupem bucati si il punem intr-o punga mare care se sigileaza si il batem bine cu sucitorul (cu cat sunt mai mici cu atat e mai bine)
We let it cool down and we take the pieces and place them in a zipper bag. We close the bag and beat the sugar pieces with a a heavy tool, until it's broken in small pieces, the smaller the better.
Zaharul ars zdrobit: (eu am luat cateva "picaturi" mai mari pentru decor)
I've taken some bigger pieces for decorating the cake.
Intr-un bol mixam frisca foarte bine si adaugam alunele zdrobite si zaharul ars.
In a bowl, we beat the cream very well, and we add the caramelized sugar and the chopped nuts and we fold them gently into the cream.
Crema 2 este gata:
Cream number 2 is finished:
Scoatem crema 1 de la frigider si ne apucam de asamblat. Foaie + 1/3 crema 1 + 1/3 crema 2, foaie, etc.
Punem o foaie pe un platou si peste intindem 1/3 din crema 1.
We can start assembling the cake following this rule: 1 sheet of cake, 1/3 of cream no 1, 1/3 of cream no 2, and so on...
We place a cake sheet on a big plate and we put 1/3 of cream no 1 on top.
Intindem 1/3 din crema 2 peste:
We place 1/3 of cream no 2 above:
Repetam actiunea pana cand terminam cu stratul din crema 2.
We repeat these layers until we finish with cream no 2 on top.
Batem optional 250 ml frisca si intindem deasupra. Razuim ciocolata alba si punem picaturile de zahar ars.
We whip the other 250 ml of cream (optional) and we decorate the cake with it, adding white shredded chocolate and "tears" of caramel on top.
Tortul frumos decorat il dam la frigider pentru minim 6 ore, timp in care zaharul ars se va topi in crema.
We place the nicely decorated cake in the fridge for at least 6 hours, in this time the caramel will slowly melt in the cream.
Sectiune si felie pentru voi:
A section for you:
Si o felie delicioasa de tort ca sa sarbatorim :) Bon appetit si sa fiti iubiti!
And a slice of cake so we can celebrate :) Bon appetit and be loved!
Subscribe to:
Posts (Atom)