Share
Nu stiu daca in Romania lumea mananca Jello, dar pe aici e ceva comun fiindca e foarte usor de preparat si racoritor, perfect pentru party-uri vara; cand am vazut prima data reteta aceasta de jeleu cu lapte condensat la justJenn recipes am fost atat de impresionata de cum arata, ca m-a bantuit gandul acela pana am facut si eu :) recunosc ca nu ma omor dupa Jello facut simplu, dar cu lapte condensat parca are cu totul alta aroma! e simplu de preparat si arata deosebit, copiii sunt innebuniti dupa el, plus ca se pot face variatii multiple de culori si arome in functie de ocazie.
Nu am tradus denumirea din engleza pentru ca nu suna bine nicicum, in engleza vine cioburi de jeleu, deoarece imita cioburile de sticla :) Sper sa-l incercati si sa-i fermecati pe cei dragi, in special pe cei mici! Cu aceasta reteta participi la YBR organizat de Nancy de la SpicieFoodie!
I don't know if Romanians eat Jello, but around here it's very common since it's easy to prepare and refreshing, perfect for summer parties; when I first saw this recipe with sweetened condensed milk at justJenn recipes I was so impressed with the design that the thought of making it myself haunted me until I made it :) I do admit that I'm not a huge fan of Jello, but combined with condensed milk, it has a different flavour! it's very easy to prepare it and it looks awesome, children are crazy about it, plus you can make different variations of Broken Jello using different colors and flavors according to the occasion.
I didn't translate in Romanian "Broken Glass Jello", because it sounds different, the name derives from comparing jello pieces with glass shards :) I hope you'll try this recipe and charm your dear ones, especially your little ones! I'm submitting this recipe to Nancy's YBR!
Ingrediente/Ingredients:
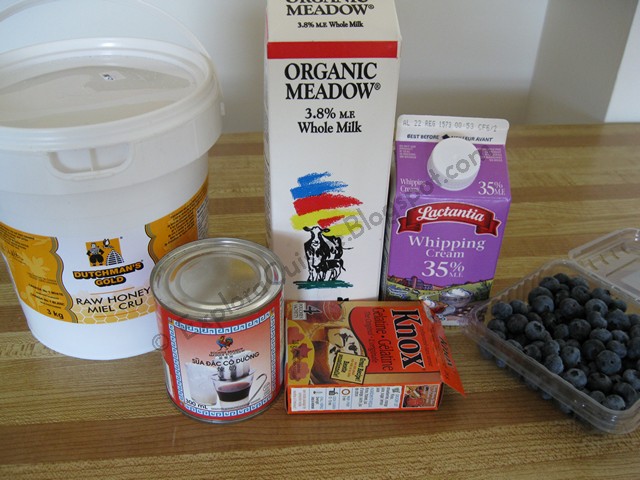
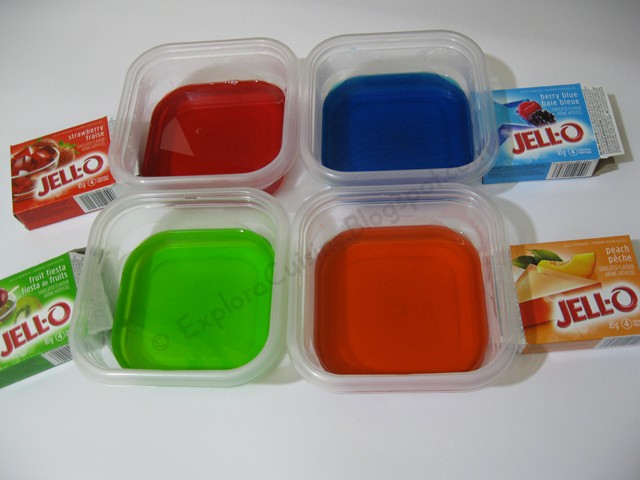
4 pachete de Jello de 85 g de culori diferite:/4 Jello packages of 85 g (3 oz) with different colors:
--capsuni/strawberry
--fruit fiesta/fruit fiesta
--fructe de padure/blue berry
--piersici/peach
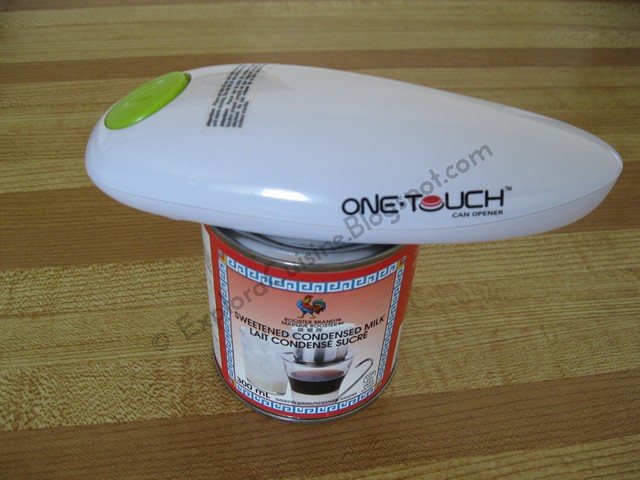
1 cutie lapte condensat indulcit (nu lapte evaporat)/1 can of sweetened condensed milk (not evaporated milk)
2 plicuri de gelatina/2 sachets with unflavored gelatine (Knox)
apa/water
Nota/Note: nu am mai pus Jello de struguri, apare din greseala in poza/I didn't use the Grape Jello, it's in the pic by mistake)
Cum se face/How it's made:
Dizolvam praful de Jello separat in cate o cutie de plastic nu foarte mare, (ale mele au vreo 10*10cm) fiecare cu cate 250 ml apa clocotita.
We dissolve the Jello separately, each flavor in one container (small lunch box) with 1 cup of boiling water.
Punem in frigider pentru minim 4 ore (eu am lasat peste noapte). Cand jeleul s-a intarit bine, scoatem din frigider si il taiem cubulete.
We chill the Jello for at least 4 hours (I left it overnight). When Jello has set, we remove it from the fridge and cut it in small blocks each flavor.
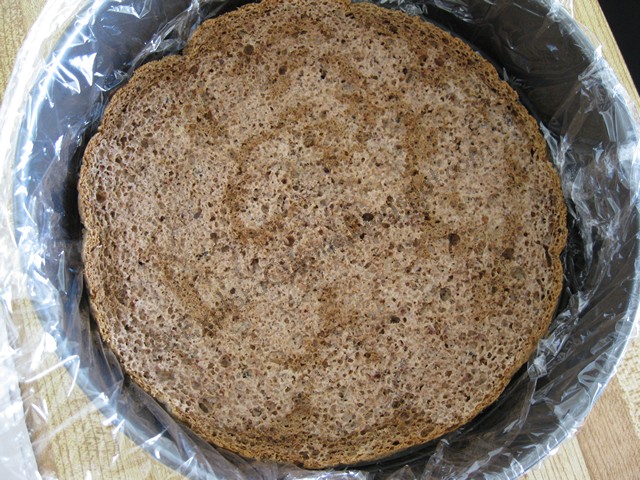
Cu grija scoatem jeleul afara din cutii si il asezam intr-o tava de sticla tapetata cu folie alimentara de 22*33 cm, avea a mea, mixand culorile usor (eu am asezat in mai multe randuri din fiecare culoare, ca sa nu-l amestec cu lingura, ca se rupe usor)
Carefully, we remove the Jello from the containers and we place the blocks in a 9*13 glass pan that has saran wrap on it, gently mixing the colored blocks (I placed the blocks in several batches by hand, so I won't tear them apart by using a spoon)
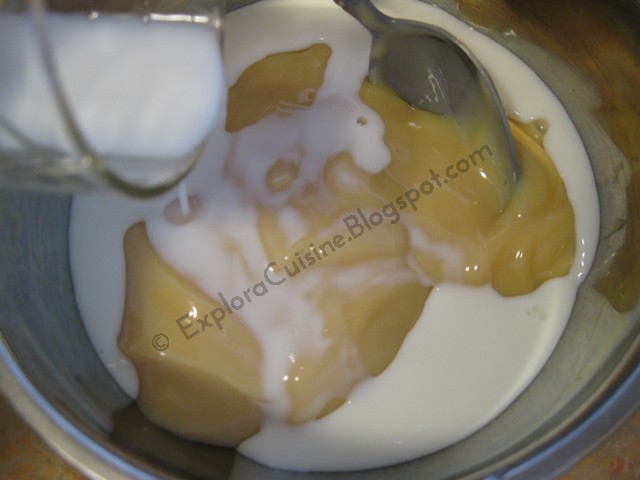
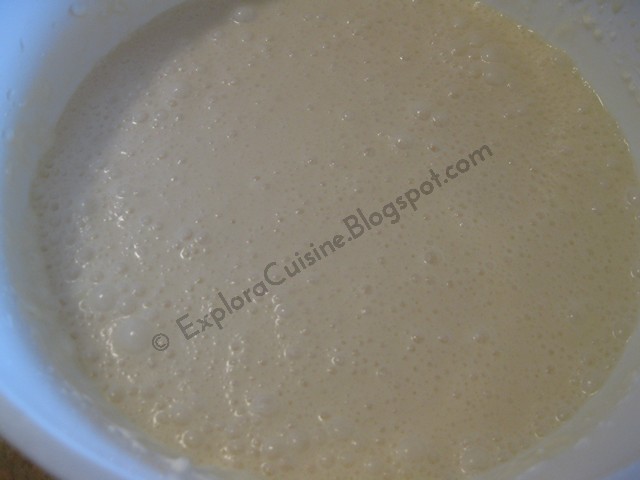
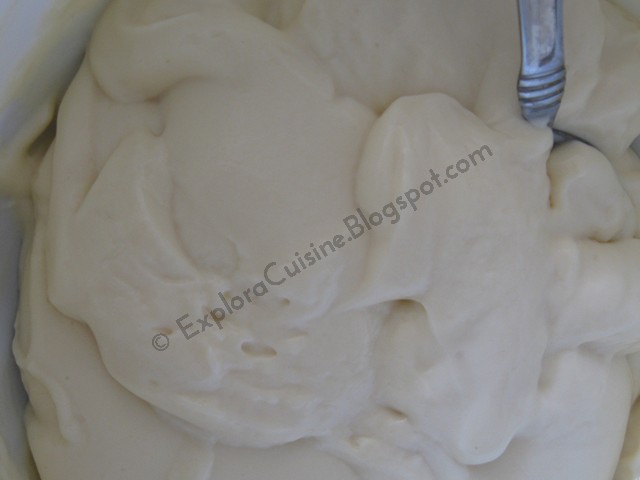
Dizolvam cele 2 pliculete de gelatina in 125 ml apa rece si dupa ce incepe sa se solidifice adaugam 375 ml apa clocotita, amestecam bine si lasam sa se raceasca 10 secunde si adaugam laptele condensat. Amestecam si lasam sa se raceasca de tot. Daca nu se raceste de tot va topi cuburile de Jello!
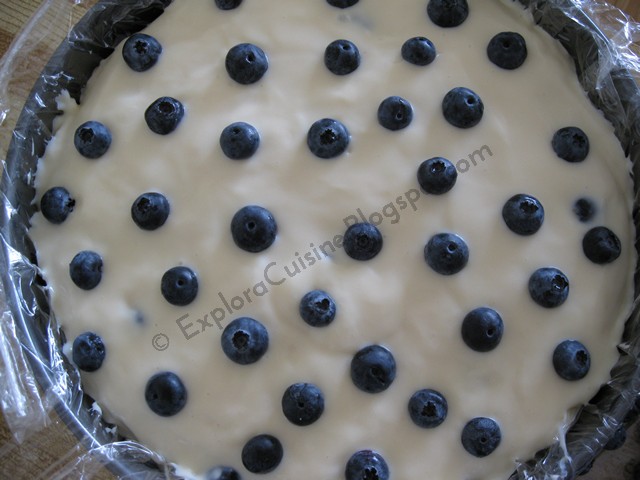
Cand s-a racit (fara a se solidifica totusi) turnam in tava peste Jello si usor miscam cu o lingura cuburile, pentru a fi bine distribuite.
We dissolve the gelatin in 1/2 cup cold water and when it starts to bloom we add 1 1/2 cup boiling water, we mix it very well, we let it cool for 10 seconds and we add the condensed milk. We mix very well and we let it cool completely. If it's not completely cooled it will melt the Jello blocks!
When the milk mixture has cooled (without being solid) we pout it in the pan on the Jello, mixing gently with a spoon to evenly distribute them.
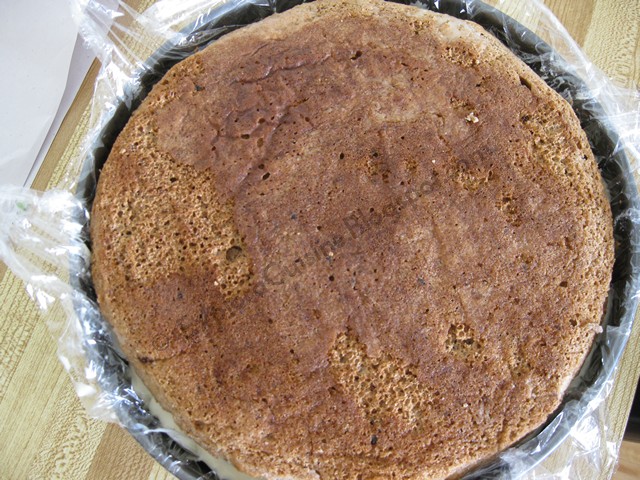
Punem tava in frigider pentru minim 5 ore.(eu am lasat peste noapte). A doua zi scoatem jeleul cu tot cu folie si taiem cuburi sau diverse forme dupa plac si servim. Voila!
We place the pan in the fridge and we chill for at least 5 hours 9I left it overnight). The second day we remove the Jello with the saran wrap and we cut it in blocks or different shapes and we serve. Voila!
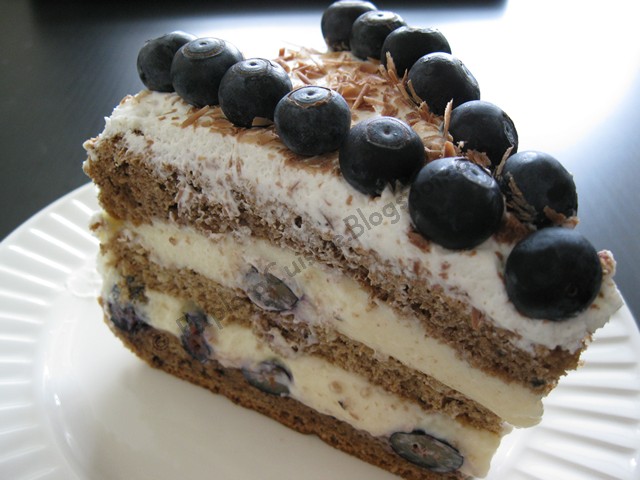
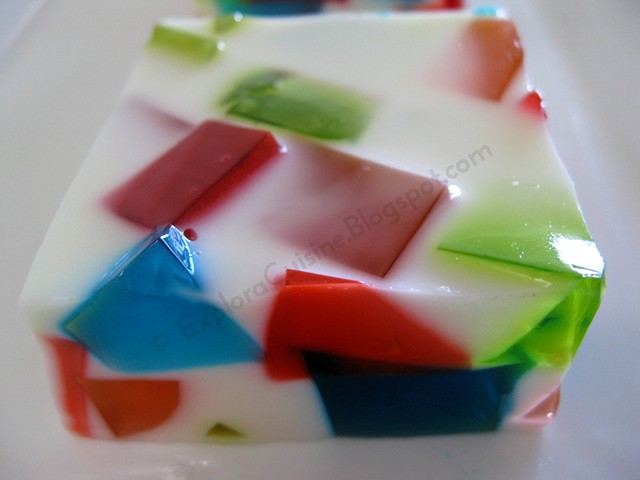
Mai de aproape...Superb colorate, atrag cu siguranta atentia oricui :)
Closer...Beautifully colored, they draw anybody's attention :)
Cu cat amestecati mai bine culorile, cu atat va fi mai frumos colorat in final.
The more you mix the colors, the more colored they'll turn out in the end.
Si inca una...One more...Enjoy!
Showing posts with label lapte condensat (condensed milk). Show all posts
Saturday, July 9, 2011
Tuesday, April 5, 2011
Magic bars
Share
Am aflat de aceasta prajitura cu mult timp in urma de la o amica si dupa ce am preparat-o am uitat de ea, caci trebuie sa recunosc ca nu sunt un fan ciocolata in prajituri :) am o reala problema cand vreau sa cumpar ceva de la un coffee shop pe aici prin Toronto, aproape toate prajiturelele au glazura de un fel sau altul, iar cand intreb de ceva fara zahar deasupra, deci "plain", se uita ciudat la mine :) cu o privire care zice "cum poti sa nu iubesti toppingul?" :))
Ca sa revin la subiect, din cand in cand mai fac cate ceva cu ciocolata pentru sotul meu, sau ca mi se pune pata pe cine stie ce desert ce vreau sa il incerc. Magic bars sau Prajitura Magica, face parte din experimentele mele, si imi place tare mult caci e o combinatie foarte potrivita intre biscuite, cocos, nuci si ciocolata, similara cu batoanele Snickers. Se pastreaza foarte bine, si are un gust deosebit pentru cat de simplu se prepara. Reteta exacta (eu am modificat-o o idee) o vazusem la DiamondLovesCuisine care mi-a reamintit de ea, va sugerez sa ii vizitati blogul, este o fata extraordinara cu niste maini de aur!
I found out about this recipe a long time ago from a friend of mine and after I made it myself, I totally forgot about it, since I have to admit I'm not really a huge fan of desserts that contain chocolate :) I have a real problem when I want to buy something from a coffee shop here in Toronto, almost all cookies have a glaze of some kind, and if I ask about something "plain", without any sugar on top, I get a funny look that says "How can you not love toppings?" :))
Ingrediente/Ingredients:
Pt 1 tava 23x23/ For 23/23 pan size:
120 g unt/120 g butter
150 g biscuiti (eu am avut cu miere)/150 g graham crumbs
100 g cocos/100 g coconut flakes
150 g ciocolata fulgi/150 g chocolate chips
100 g nuci/100 g walnuts
400 ml lapte condensat/400 ml condensed milk
Cum se face/How it's made:
Atentie! Nu apasati sau amestecati straturile, doar presaram un strat peste altul si introducem in cuptor.
Topim untul la microunde si il turnam in tava.
Zdrobim bine biscuitii si ii presaram peste unt intr-un strat uniform, fara sa apasam.
Peste biscuiti presaram fulgii de cocos cat mai uniform.
Peste cocos punem ciocolata fulgi, eu am cumparat bobite mici de ciocolata, dar puteti sa taiati bucatele ciocolata daca preferati (nu va recomand sa razuiti ciocolata)
Peste ciocolata intindem in start uniform nuca taiata bucati mici.(puteti inlocui cu alune de padure sau migdale)
Peste nuca, intindem in start cat mai uniform laptele condensat (eu am avut conserva de 300 ml, aici asa sunt toate, si a iesit mai uscata putin prajitura, va recomand sa puneti 400 ml!)
Introducem tava in cuptorul preincalzit la 180 grade timp de 20-25 minute, pana incepe sa se rumeneasca putin; la mine a stat o idee cam mult.
Lasati sa se raceasca complet si taiati dupa preferinta. Eu am pus tava putin in frigider, ca sa se taie mai bine.
O puteti pastra in frigider pentru mai multe zile, dupa o zi parca e si mai buna!
Foarte simplu de facut iar daca aveti copii, cu siguranta va disparea repejor din farfurii :) Bon appetit!
Sper sa va placa! Bon appetit!
Hope you enjoy!
Am aflat de aceasta prajitura cu mult timp in urma de la o amica si dupa ce am preparat-o am uitat de ea, caci trebuie sa recunosc ca nu sunt un fan ciocolata in prajituri :) am o reala problema cand vreau sa cumpar ceva de la un coffee shop pe aici prin Toronto, aproape toate prajiturelele au glazura de un fel sau altul, iar cand intreb de ceva fara zahar deasupra, deci "plain", se uita ciudat la mine :) cu o privire care zice "cum poti sa nu iubesti toppingul?" :))
Ca sa revin la subiect, din cand in cand mai fac cate ceva cu ciocolata pentru sotul meu, sau ca mi se pune pata pe cine stie ce desert ce vreau sa il incerc. Magic bars sau Prajitura Magica, face parte din experimentele mele, si imi place tare mult caci e o combinatie foarte potrivita intre biscuite, cocos, nuci si ciocolata, similara cu batoanele Snickers. Se pastreaza foarte bine, si are un gust deosebit pentru cat de simplu se prepara. Reteta exacta (eu am modificat-o o idee) o vazusem la DiamondLovesCuisine care mi-a reamintit de ea, va sugerez sa ii vizitati blogul, este o fata extraordinara cu niste maini de aur!
I found out about this recipe a long time ago from a friend of mine and after I made it myself, I totally forgot about it, since I have to admit I'm not really a huge fan of desserts that contain chocolate :) I have a real problem when I want to buy something from a coffee shop here in Toronto, almost all cookies have a glaze of some kind, and if I ask about something "plain", without any sugar on top, I get a funny look that says "How can you not love toppings?" :))
Getting back to the point, from time to time, I do make chocolate desserts for my husband, or because I really wanna try some new recipe. Magic Bars are one of my experiments which I enjoy since it has a very good combination between crackers, coconut, nuts and chocolate, similar to Snickers. It's very tasty and lasts for days. I saw the exact recipe at DiamondLovesCuisine, who reminded me of Magic Bars, I really recommend her amazing blog, she's a lovely girl with golden hands!
Ingrediente/Ingredients:
Pt 1 tava 23x23/ For 23/23 pan size:
120 g unt/120 g butter
150 g biscuiti (eu am avut cu miere)/150 g graham crumbs
100 g cocos/100 g coconut flakes
150 g ciocolata fulgi/150 g chocolate chips
100 g nuci/100 g walnuts
400 ml lapte condensat/400 ml condensed milk
Cum se face/How it's made:
Atentie! Nu apasati sau amestecati straturile, doar presaram un strat peste altul si introducem in cuptor.
Topim untul la microunde si il turnam in tava.
Attention! We do not press the layers, or mix anything, just make layers and place in the oven.
We first melt the butter and we pour it in the pan.
Zdrobim bine biscuitii si ii presaram peste unt intr-un strat uniform, fara sa apasam.
On the melted butter, we place the cracker crumbs evenly.
Peste biscuiti presaram fulgii de cocos cat mai uniform.
We add the coconut on top evenly.
Peste cocos punem ciocolata fulgi, eu am cumparat bobite mici de ciocolata, dar puteti sa taiati bucatele ciocolata daca preferati (nu va recomand sa razuiti ciocolata)
We place the chocolate chips evenly, you can chop some chocolate if you like.
Peste ciocolata intindem in start uniform nuca taiata bucati mici.(puteti inlocui cu alune de padure sau migdale)
We add the chopped walnuts on top of the chocolate chips evenly.(you can replace the walnuts with hazelnuts or almond)
Peste nuca, intindem in start cat mai uniform laptele condensat (eu am avut conserva de 300 ml, aici asa sunt toate, si a iesit mai uscata putin prajitura, va recomand sa puneti 400 ml!)
We pour condensed milk all over the pan (I suggest you use 400 ml condensed milk, I only had 300 ml, and it was a little bit dry)
Introducem tava in cuptorul preincalzit la 180 grade timp de 20-25 minute, pana incepe sa se rumeneasca putin; la mine a stat o idee cam mult.
We place the pan in the preheated oven at 350 degrees for 20-25 minutes, until it starts to golden brown a little; mine stayed in the oven a little bit more than it had to.
Lasati sa se raceasca complet si taiati dupa preferinta. Eu am pus tava putin in frigider, ca sa se taie mai bine.
O puteti pastra in frigider pentru mai multe zile, dupa o zi parca e si mai buna!
We remove the pan from the oven and let it cool off. We can place it in the fridge a little so it's easier to slice.
We slice it as we please. You can keep it in the fridge for days, because it gets better with each day, if it resists that long :))
Foarte simplu de facut iar daca aveti copii, cu siguranta va disparea repejor din farfurii :) Bon appetit!
It's very easy to make and if you have children the bars will disappear in no time :)) Bon appetit!
Sper sa va placa! Bon appetit!
Hope you enjoy!
Wednesday, March 9, 2011
Tort Milch Schnitte cu afine (Blueberry Milch Schnitte Cake)
Share
Please scroll down for English version
Ieri am fost toata ziua plecata cu sotul meu si de aceea nu am apucat inca sa postez tortul pe care l-am facut de 8 Martie. Nu puteam sa las sa treaca aceasta zi fara un mic desert, asa ca m-am hotarat sa fac un tort Milch Schnitte (felie de lapte) si bine am facut, pentru ca e un tort foarte usor, cu o crema fina si pufoasa, iar afinele ii dau o aroma speciala :) Sper sa va placa!
Ingrediente:
3 foi pandispan cu cacao
300 ml lapte condensat
300 ml frisca lichida
150 ml lapte
1 lingura plina cu miere
1 plic gelatina
300 g afine proaspete
200 ml frisca pt decorat
Cum se face:
First we prepare the sponge cake, like here, but we have to make it bigger for 3 layers and add cocoa, so I recommend 9 eggs, 9 tablespoons of sugar, 6 tablespoons flour, 3 tablespoons cocoa powder, 1/2 teaspoon baking powder. After you bake the sponge cake, you let it coll down, and slice it in 3 layers. (I made one sponge cake with 5 eggs, and decide it the last moment to make one more from 2 eggs, so that I have 3 layers instead of two)
Please scroll down for English version
Ieri am fost toata ziua plecata cu sotul meu si de aceea nu am apucat inca sa postez tortul pe care l-am facut de 8 Martie. Nu puteam sa las sa treaca aceasta zi fara un mic desert, asa ca m-am hotarat sa fac un tort Milch Schnitte (felie de lapte) si bine am facut, pentru ca e un tort foarte usor, cu o crema fina si pufoasa, iar afinele ii dau o aroma speciala :) Sper sa va placa!
Ingrediente:
3 foi pandispan cu cacao
300 ml lapte condensat
300 ml frisca lichida
150 ml lapte
1 lingura plina cu miere
1 plic gelatina
300 g afine proaspete
200 ml frisca pt decorat
Cum se face:
Mai intai facem un pandispan de cacao, dupa reteta de aici, doar ca mai mare sa-l puteti taia in 3 felii, eu recomand din 9 oua, 9 linguri zahar, 6 linguri faina, 3 linguri cacao, 1 praf de copt, pe care il coaceti la foc potrivit timp de 25-30 minute. Il dati la racit si il taiati in 3 felii. Eu am facut un blat din 5 oua, dupa care am mai facut unul mic din 2 oua (m-am hotarat in ultimul moment sa il fac din 3 felii, nu 2).
Ne apucam de crema si desfacem conserva de lapte condensat, eu aveam cumparat, caci se gaseste pe aici.
Intr-un bol amestecam laptele condensat cu 75 ml lapte.
Gelatina o dizolvam pe foc mic cu 75 ml lapte, fara a o lasa sa fiarba, caci se distrug proprietatile ei, amestecand foarte bine, pana se dizolva complet.
Adaugam gelatina la laptele condensat, punem mierea si amestecam bine.
Batem frisca foarte bine.
Adaugam laptele condensat la frisca si amestecam foarte bine; compozitia rezultata a fost destul de lichida, dar s-a intarit la frigider ulterior.
Dam crema la frigider pentru o ora, amestecand de 2 ori in ea in timpul acesta. Crema se va ingrosa treptat.
Cand crema s-a ingrosat, incepem asamblarea tortului. In tava in care am copt blatul, punem un strat de folie alimentara pe peretii tavii si adaugam prima felie de blat insiropata cu putin lapte in cazul meu.
Punem jumatate din crema peste prima foaie de blat si nivelam. Afinele le spalam si le uscam cu servete de hartie foarte bine, iar apoi presaram pe crema cateva.
Adaugam a doua foaie de blat insiropata, punem crema ramasa si din nou afine, peste care punem ultima foaie de blat insiropata cu lapte si dam la frigider pentru minim 4 ore.
Dupa vreo 4 ore, scoatem tortul din frigider, il rasturnam pe un platou dintr-o miscare, si il ornam cu frisca si afine dupa plac. Eu am presarat si putina ciocolata rasa.
O poza cu sectiunea...
Si o poza cu o felie buna cu mult lapte :) este delicios! Bon appetit!
English version
Yesterday I was away all day long with my husband and that's why I didn't have a chance to post the cake recipe I made for March 8. I couldn't let this day go without a yummy dessert, so I decided to make a Milch Schnitte cake (cake slice with milk in German), and it was a good decision, because it's a delicious cake, with a delicate cream and the blueberries gives the cake a lovely flavor :) I hope you'll like it!
Ingrediente:
3 layers of cocoa sponge cake
300 ml condensed milk
300 ml cream
150 ml milk
1 full tablespoon honey
1 small package gelatin
300 g blueberries
200 ml whipped cream for decorating
How it's made:
We start preparing the cream, by opening the can of condensed milk.
In a bowl, we mix the condensed milk with 75 ml milk.
We dissolve the gelatin in the other 75 ml of milk and we add it to the condensed milk, along with the honey, and we mix very well.
We whip the cream and we add the condensed milk mixture to the whipped cream, mixing it very well, and we place it in the fridge for 1 hour, stirring from time to time.
After the milk cream has thickened, we start to assembly the cake.
In the pan that we baked the cake, we place some foil, and we put the first layer of cake, premoistened with a little bit of milk.
We add half the cream (thickened).
We wash the blueberries and we absorb the water with paper towels, after which we place some blueberries on top of the cream.
We add the second layer of cake, the rest of the cream, sprinkle some more blueberries and we place the last layer of cake on top. We place the pan in the fridge for at least 4 hours.
After 4 hours, we decorate the cake with whipped cream and blueberries.
A section...
A slice of the cake :) it's delicious! Bon appetit!
Subscribe to:
Posts (Atom)