Showing posts with label aperitiv (appetizer). Show all posts

Wednesday, June 27, 2012

Chiftele de zucchini (Zucchini Fritters)

Share


    Am vrut neaparat sa particip din nou la provocarea Dulce Romanie, Provocarea Lunii Iunie fiind organizata de Andie de la Andie's Veggies si care are ca tema un preparat vegetarian. Mi s-a parut foarte buna ideea asa ca musai sa particip si eu cu o reteta, ca daca eram mai inspirata putin participam si cu Prajitura cu capsuni. Blogul lui Andie este unul foarte dragut cu multe retete sanatoase pe care va invit cu drag sa-l vizitati, mai ales ca provocarea aceasta va fi de senzatie, sunt sigura!
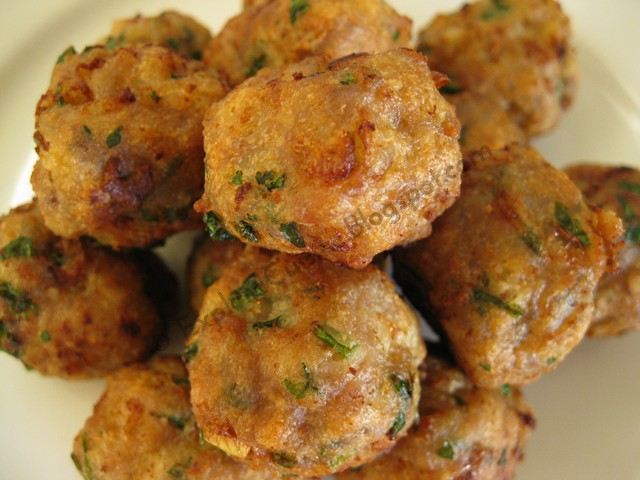
    Am cumparat cam mult zucchini si dupa ce am facut pentru a zecea mia oara un minunat tian de legume cu el, ce mi-a ramas am folosit la chiftele de zucchini, o reteta care ne place destul de mult, tinand cont de faptul ca eu nu sunt mare fan dovlecei in general. Am pus totul pe masa si m-am apucat de treaba, ca doar e tare simplu si poti jongla cu ingredientele! Va sfatuiesc sa le incercati ca sunt foarte gustoase, le puteti servi la micul dejun, cina sau pachetel la munca. Banuiesc ca sunt mai light daca le faceti la cuptor, eu una am preferat sa le prajesc, gustul e mult mai intens asa, dupa parerea mea :)
    I really wanted to participate in June's Sweet Romania Challenge hosted by Andie from Andie's Veggies, which has a vegetarian dish as a theme. I thought it's a great theme so I decided to send a recipe, though if I were more inspired I would've send my Strawberry Cake recipe as well. Andie's blog is very cozy with lots of healthy recipes and I invite all of you to check it out, now that this challenge will really be a great one!
    I bought too much zucchini and after I've made for the thousand time the wonderful Vegetable Tian, I used  the rest of zucchini to make some Zucchini Fritters, a recipe that we truly enjoy, considering that I'm not a huge fan of this vegetable. I've put everything on the table and started cooking, since it's easy to make and you can play with ingredients. I advise you to try them out because they're very tasty and you can serve them at breakfast, dinner or at lunch. I guess baking them would make them lighter, I preferred to fry them, I find the taste more intense when fried :)


Ingrediente/Ingredients:                                                       

3 zucchini medii/3 medium zucchini
2 oua/2 eggs
50 g parmezan/50 g parmesan
50 g pesmet/50 g bread crumbs
100 g faina alba/100 g white flour
4-5 catei usturoi/4-5 garlic cloves
patrunjel verde/fresh parsley
sare, piper/salt, pepper
ulei pt prajit/oil for frying

Cum se face/How it's done:

Spalam zucchini-ul bine si il dam pe razatoare cu tot cu coaja, adaugam sare si lasam sa stea vreo 15 minute pentru a elibera zeama.
We wash the zucchini and we grate it with the peel on, we add salt and we let it sit for 15 minutes so we can drain the water.


Cu mainile stoarcem zucchini de zeama lasata si adaugam ouale, faina, pesmetul, parmezanul, usturoiul zdrobit, patrunjelul tocat, sare si piper dupa gust si amestecam bine.
With our hands we drain the zucchini and we add eggs, flour, bread crumbs, parmesan, crushed garlic, chopped parsley, salt and pepper to taste and we mix them all together.


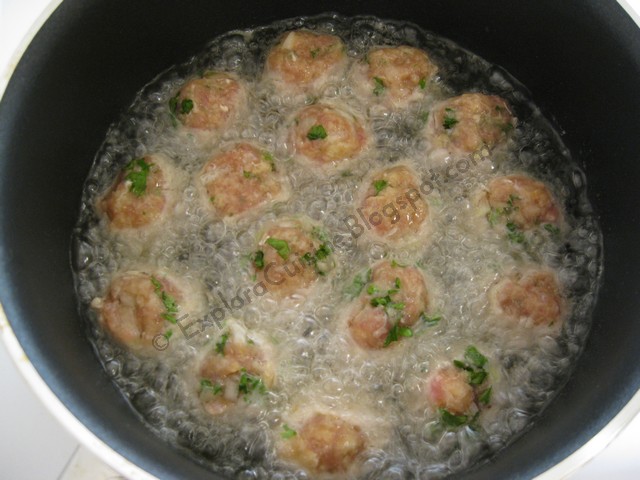
Intr-o tigaie incingem ulei si luam cu lingura din compozitie, formand chiftele pe care le prajim cate 2-3 minute pe fiecare parte pana au o culoare maronie.(mie imi plac prajite bine)
We heat the oil in a skillet and we use a spoon to form the fritters which we fry 2-3 minutes on each side until they get a nice golden brown color.(I like them well fried)


Le scoatem pe servete de hartie sa absoarba uleiul.
We take them out on paper towels to absorb the oil.


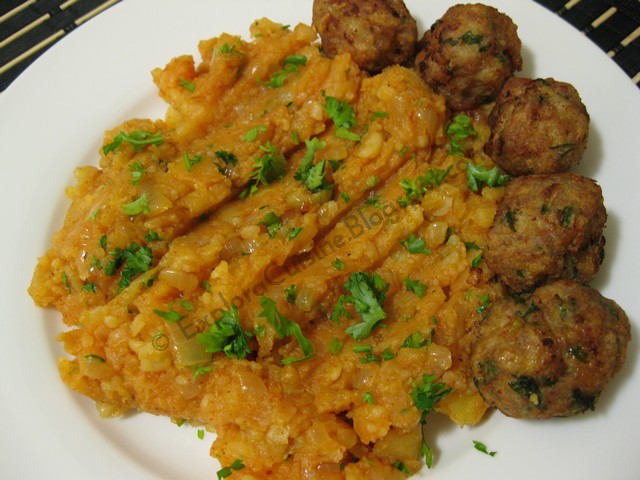
Servim chiftelele cu sos de iaurt si patrunjel verde sau legume proaspete langa si cu multa pofta :) la cat de bine miroase, ai manca cu cate 2 maini, pe cuvant!
We serve the fritters with a yogurt and parsley dip or with fresh vegetables; they smell so delicious that you wanna eat with 2 hands, trust me!


Mai de aproape...Bon appetit!/Closer...Bon appetit!


Sunday, September 4, 2011

Salata de conopida cu maioneza (Cauliflower Salad with Mayonnaise)

Share

       Ce bine e sa pot posta din nou ceva bun, mi-a fost teribil de dor de toate blogurile si retetele minunate dar mai ales de toti cei care ma vizitati! viata mi-a rezervat niste schimbari lately, asa ca a trebuit sa tot aman activitatea pe blog :( vreau sa stiti insa ca am citit toate mesajele lasate, am incercat pe cat posibil sa va urmaresc si pot sa sa va spun ca am sa-mi dau silinta sa nu mai absentez atat de mult :)  am avut o vara incarcata pe toate planurile si am gatit destul de putin, dar tot am reusit sa mai fac cate ceva bun  :) promit sa recuperez timpul pierdut!
        Am zis ca e foarte potrivit sa postez reteta pentru salata de conopida, pe care sunt sigura ca toti o cunoasteti deja, doar e atat de simplu de preparat! nu e una dintre preferatele mele, dar atunci cand o prepar o mananc cu multa pofta :) Enjoy!
       It feels so good to be able to post something delicious again, I terribly missed all the lovely blogs and the mouth watering recipes, but most I missed all you wonderful people that visit me! life has reserved some changes for me lately so I had to keep delaying my blog activity :(  I want you to know though that I read all your messages and I tried to follow you as much as I could and I can only say that I promise to do my best and keep up with everything better :) I had a very complex summer on all levels and I barely cooked but I did make some delicious meals that I need to show you!
       I think it's the best moment to post my Cauliflower salad, which I'm sure you all know it by now, since it's so easy to make! it's not one of my favorites, but I do love it each time I prepare it :) Enjoy!


Ingrediente/Ingredients:     


 2 buc conopida/2 pcs of cauliflower
 1 ceapa/1 onion

 3 galbenusuri/3 egg yolks
 1 lingurita mustar/1 teaspoon with mustard
 300 ml ulei vegetal/300 ml vegetable oil
 sare, piper/salt, pepper
 suc de lamaie/lemon juice     


Cum se face/How it's made:  


Mai intai curatim conopida si o desfacem in buchetele mai mici si o fierbem in apa sarata cam 20 de minute.
We first clean the cauliflower and we break it in small bouquets and we boil it in salted water for 20 minutes.


Cand e fiarta o strecuram bine de apa si o zdrobim bine cu furculita sau cu un chopper.
When it's tender we drain it very well and we smash it with a fork or using a chopper.


O lasam sa se raceasca si facem maioneza din 3 galbenusuri, putina sare si mustar, adaugand treptat cate putin ulei la inceput, pentru a nu se taia. Continuam sa punem ulei pana cand am obtinut cata maioneza dorim, mie imi place mai multa.
We let the cauliflower cool and we start making the mayonnaise using 3 egg yolks, a pinch of salt and mustard, adding oil a little at a time. We continue adding oil until we obtain the amount of mayonnaise that we want, I usually want more.


Cand conopida s-a racit de tot o amestecam cu maioneza obtinuta si cu ceapa tocata, adaugam suc de lamaie dupa gust, sare, piper si servim. E super buna si extrem de rapid de facut si  perfecta ca aperitiv pentru petreceri! Bon appetit!
When the cauliflower has cooled completely, we combine it with the mayonnaise and chopped onion, we add some lemon juice according to taste, salt and pepper and we serve. It's delicious and so simple to make and goes perfectly as an appetizer for parties! Bon appetit!


Minunata/Lovely


Mai de aproape/Closer:


Monday, July 11, 2011

Ciuperci marinate (Marinated Mushrooms)

Share

 
        Nu cred ca sunt legume pe care sa le iubesc mai mult decat ciupercile, micutele palarii aromate ce dau o savoare deosebita oricarui tip de mancare! Noua personal cel mai mult ne plac ciupercile marinate, obisnuiam sa cumparam de la deli bar din supermarket cu vreo 3$ suta de grame, desi destul de scumpe sunt delicioase, problema este insa ca nu se gasesc in toate supermarketurile aici; nu pun la socoteala cele la borcan pe care le gasim peste tot pentru ca nu se pot compara deloc!
        Tot cautand o reteta pentru ciupercile acestea gustoase, am gasit reteta care imi place la Mary de la One Perfect Bite si nu pot decat sa-i multumesc inzecit in numele meu si al sotului meu, pentru ca le adoram!!! Sunt zemoase, usor acrisoare cu aroma de usturoi si oregano, atat de bune ca nu te poti opri din mancat! Merg perfect ca salata langa friptura sau ca aperitiv (Antipasto) la mese festive, sau de ce nu, la un picnic langa niste branza, mmmm, senzational! pentru cei care sunteti fani ciuperci va recomand calduros sa le incercati, veti fi vrajiti cu adevarat :)
        I don't think there are any vegetables that I love more than mushrooms, the little caps that bring flavor to any prepared meal you can think of! We personally love best marinated mushrooms, we used to buy them at the deli bar in the supermarket with 3$ for 100 g, though pricey they're delicious, the only problem is that we can't find them in all supermarkets here; I'm not counting the ones you find in jars everywhere since you can't compare their taste!
        Browsing the web for the perfect recipe, I found what I was looking for at Mary's from One Perfect Bite, who I can only thank a hundred times, because we just adore the mushrooms! they're moist, a little bit sour and beautifully flavored from garlic and oregano, so yummy that you just can't stop eating! you can serve them as a salad next to steak, or as an appetizer (Antipasto) for special dinners, or why not, eat them at a nice picnic with cheese, mmmm, awesome! for those of you that love mushrooms this recipe is a must, I truly recommend it and believe me when I tell you that you'll be charmed forever :)


Nota/Note:   eu am facut din 750 g ciuperci, reteta de mai jos e pentru 500 g/I used 750 g mushrooms, the recipe from below is for 500 g mushrooms  

Ingrediente/Ingredients:

500 g ciuperci Champignons/500 g white mushrooms
1 ceapa/1 onion
3 catei usturoi/3 garlic cloves
130 ml ulei de masline/130 ml olive oil
70 ml otet/70 ml white vinegar        
1/2 lingta sare/1/2 teaspoon with salt
1 varf de zahar/1 pinch of sugar
1 varf piper/1 pinch of pepper
1/2 lingta oregano/1/2 teaspoon with oregano

Cum se face/How it's made:
         
Curatam ciupercile si le spalam bine--data viitoare voi face reteta cu mai multe tipuri de ciuperci pentru mai multa savoare!/We clean and wash the mushrooms--next time I'll try the recipe with more types of mushrooms for enhanced flavor!


Fierbem ciupercile in apa sarata pentru 10 minute, pana cand se inmoaie putin. Cand sunt gata, le scurgem de apa si le punem intr-un recipient.
We simmer the mushrooms in salted water for 10 minutes, until they are tender. When they're tender we drain the water and we place them in a bowl.

  
Intr-un recipient punem ciupercile, uleiul, ceapa tocata, usturoiul zdrobit si celelalte ingrediente si le amestecam bine.
In a container we place the mushrooms, oil, vinegar, the chopped onion and crushed garlic and the other ingredients and we stir everything.
  

Punem capac si lasam in frigider pana a doua zi sa se marineze, minim 24 de ore preferabil. Cu cat lasam mai mult cu atat vor fi mai gustoase. Servim cu pofta la micul dejun sau la cina langa branza, masline, sunca, etc.
We cover the container and we place it in the fridge to marinate overnight, 24 hours is preferable. The longer it stays in the fridge the tastier they'll get. We serve them for breakfast or dinner next to cheese, olives, ham, etc. 


Sunt dementiale, trebuie sa le incercati! o sa va atraga ca magnetul pana cand vor fi gata :)) Bon appetit!
They're amazing, you gotta try them! they'll attract you like a magnet until they'll be finished :)) Enjoy!

Saturday, May 14, 2011

Maki Sushi cu sparanghel, avocado si somon afumat (Smoked salmon, Avocado and Asparagus Maki Sushi)

Share


      Sushi este un fel de mancare de origine japoneza compus din orez preparat cu otet si alte ingrediente. Exista multe tipuri de a-l prepara, dar toate au la baza orezul pentru sushi. Maki sushi reprezinta rulouri de orez invelite in foite din alge de mare uscate numite Nori, si umplute cu diverse legume, peste crud, crab, etc....Fiind un aperitiv light, colorant si foarte apetisant, este preferat de foarte multa lume.
      Pentru ca am vrut sa postez si o reteta mai interesanta pentru Sparanghel, unul din ingredientele provocarii  lunii mai "Dulce Romanie", am ales reteta de maki sushi utilizand avocado, ardei, sparanghel si file de somon afumat, caci nu sunt mare fan al  pestelui crud :) Credeam ca modul de preparare este dificil, dar cand am ajuns pe terminate, pot sa zic ca era deja distractiv, plus ca poti deveni extrem de creativ in privinta ingredientelor. Fiind prima data ca le fac, nu m-am abatut de la ce mi-am propus, dar pe viitor, am gasit deja multe alte modele ce vreau sa le incerc. Sper sa va ajute pozele step-by-step, e tare simplu de facut si efectul e garantat :)
Pentru reteta de mai jos, m-am inspirat de aici si particip cu ea la YBR pentru luna Mai organizat de Nancy de la SpicieFoodie, care apropo are niste retete grozave, neaparat sa o vizitati!
      Sushi represents a Japanese food consisting of cooked vinegared rice and other ingredients. There are multiple ways of preparing it, but they all have in common the sushi rice. Maki sushi represents sushi rolls covered in seaweed sheets named "Nori", and filled with different vegetables, raw fish, seafood, etc...
     Because I wanted to post a more interesting recipe as well that called for Asparagus, one of my 2 ingredients chosen for "Sweet Romania" challenge, I've chosen to make Maki Sushi with smoked salmon (I don't like raw fish), peppers, asparagus and avocado. I thought that rolling these would be difficult, but it turns out that it was pretty fun to make, plus you can get very creative when using fillings for the rolls. Since it was my first time making these, I followed my plan and didn't use other combinations besides the one I had in mind, but I will make different types in the future, I already found other beautiful ways of making them :)
I hope my step by step pictures will help, they're really very simple to make and they have a great effect on people :)
I'm participating with this recipe at May's YBR, organised by Nancy from SpicieFoodie, which is a terrific blog and I strongly recommend you pay her a visit, you won't be sorry!


Ingrediente/Ingredients:   

  1 "covoras" de bamboo/1 bamboo mat
  300 g orez pentru sushi (cu bob mic sau mediu)/300 g sushi rice
  2 linguri otet de orez/2 tablespoons with rice vinegar
  1 lingura zahar/1 tablespoon with sugar
  1/2 lingurita sare/1/2 teaspoon with salt
  4 Nori sheets (alge/seawood)
  4 fire sparanghel/4 Asparagus strips
  100 g file de somon afumat/100 g smoked salmon
  1 avocado/1 avocado
  1 ardei rosu (optional)/1 red pepper
  sos de soia/soya sauce
  seminte de susan (optional, eu am uitat sa pun)/sesame seeds (optional)

Cum se face/How it's made:


Mai intai ne ocupam de orez.
We first make the rice:


Spalam orezul in mai multe ape, de vreo 4 ori, pana cand apa ramane curata.
Punem orezul la fiert la foc mare intr-o oala cu apa, cat sa-l depasesca cu vreo 2 cm. Cand orezul incepe sa fiarba, dam focul mic, acoperim cu capac oala si lasam sa fiarba inca 8 minute, fara a ridica capacul de pe oala.(orezul va absorbi toata apa).
Dam deoparte orezul si mai lasam inca 10 minute. Dupa 10 minute, il transferam intr-un alt vas, si il acoperim pana cand preparam otetul sau "Sushizu".
We wash the rice very well (4 or 5 times).
In a large pot we place the rice with water, just 2 cm above the rice, and we place the pot on high heat.
When the rice starts to boil, we reduce the heat to Low, we cover and let it boil for 8 minutes (do not take the lid off).
We remove the pot from the heat and we let it steam for another 10 minutes covered.
We transfer the rice to another bowl and we cover it until we prepare the vinegar: "Sushizu"


Amestecam cele 2 linguri de otet cu 1 lingura de zahar si cu sarea si le punem pe foc sa se incalzeasca bine (fara a fierbe!). Luam de pe foc si lasam sa se raceasca. Cand s-a racit, amestecam cu orezul usor, cu o lingura de lemn, fara a zdrobi orezul si acoperim cu un capac pana terminam cu umplutura.
Curatam si fierbem sparanghelul 3 minute in apa cu sare, dupa care dam sub jet de apa rece, pentru a-i pastra culoarea si fragezimea.
Ardeiul il taiem bastonase, la fel ca avocado, iar somonul il taiem fasii subtiri.
In a small pot, we pour the vinegar, we add the sugar and salt and we stir very well until they warm up, but not boil. We set aside. When the vinegar is cold, we mix it with the rice, mixing it gently with a wooden spoon.
We start preparing the filling by boiling the asparagus for 3 minutes, and placing it after that in cold water, not to loose the color and freshness.
We cut the pepper in thin strips, as well as the avocado and smoked salmon.

Ne pregatim de asamblare:
Asezam covorasul de bamboo pe masa (eu nu am gasit de cumparat langa mine si am folosit ce aveam, de altfel foarte bun), iar peste el, asezam o foaie de alga cu fata lucioasa in jos cu grija, caci sunt foarte fragile.
On the bamboo pad, we place one Nori sheet with the shiny side facing down.(I couldn't find a bamboo mat near me so I used what I had)


Peste alga punem orez in strat potrivit de gros, apasandu-l usor si lasand o margine de 2 cm libera in partea de sus si cea de jos.(pe lateral va fi complet acoperita alga). Orezul va fi foarte lipicios, asa ca trebuie sa va udati cu apa pe maini tot timpul pentru a-l putea manevra.
With wet hands we add one layer of rice, we cover the sheet from side to side, leaving a 2 cm space on top and bottom of the sheet. We press the rice until we get a even layer. The rice will stick to your hands so make sure you wet your hands all the time.


In marginea de jos, aproape de noi, asezam somonul, sparanghelul, bastonas de ardei si avocado, toate fiind puse in fata orezului.
We place the asparagus, smoked salmon strips, peppers and avocado on the bottom, in front of the rice.


Cu mare grija, incepem sa rulam alga cu legumele peste orez cu mana, si ajutandu-ne de covoras presam usor ruloul treptat pentru a se lipi bine orezul, (am intors covorasul ca sa se vada din fata cum rulez alga)
With our hands we gently roll the sheet with the vegetables, until it reaches the rice, and we help our selves with the bamboo pad, to roll it forward, gently squeezing and pressing the sushi roll, so the rice sticks very well.


Cand ajungeti la capatul algei, umeziti cu putina apa alga pe orizontala pentru a se lipi mai bine alga si mai strangeti putin ruloul prin covoras pentru a va asigura ca ruloul s-a inchis la capete. Et voilà! (mi-au iesit 4 rulouri in total)
When we reach the end, we wet the horizontal end of the seaweed sheet so it sticks better and closes the roll more secure. Make sure that the ends are sealed.
We squeeze some more the sushi roll with the bamboo pad and we set aside. Et Voila! (I made 4 rolls)


Cu un cutit umezit in apa, taiati rulourile bucati mai mici (eu le-am taiat mici ca sa poata fi mancate usor dintr-o imbucatura).
With a wet knife, we cut the rolls in smaller pieces (I prefer them small, for a one bite meal).


 Si din alt unghi bucatelele apetisante :)
From another angle :)


Mai de aproape...
Closer...

                                          
 Serviti Maki Sushi cu sos de soia si pasta wasabi, daca va place, eu am renuntat la pasta. Bon appetit!
We serve Maki Sushi with soya sauce and Wasabi paste, if you like it, I only wanted the soya sauce.
Bon appetit!


Sunday, March 27, 2011

Terina de porc infasurata in bacon (Pork Terrine Wrapped in Bacon)

Share


Please scroll down for English version


           Cum in weekend am avut chef de gatit, am incercat terina de porc infasurata in bacon, inspirata fiind de o reteta dintr-o carte de bucate de-a mea. Terina reprezinta un chec de carne facut din carne taiata sau macinata, copt in cuptor ce se serveste la temperatura camerei; denumirea de "terrine" vine de la vasul ceramic de forma dreptunghiulara in care se gateste checul de carne. De data aceasta am incercat o reteta simpla, dar cu siguranta voi incerca si alte variatiuni ce contin ficat sau nuci, etc... Sper sa va placa!


Ingredients:      

     1 kg carne de porc tocata
     felii de bacon (eu am pus vreo 16)
     2 cepe
     4 catei usturoi
     2 oua
     2 felii de paine
     patrunjel verde
     oregano proaspat
     sare, piper


Cum se face:


Intr-un bol amestecam carnea tocata cu ceapa tocata, usturoiul zdrobit, ouale, painea maruntita, verdeata tocata si condimente si amestecam bine, formand o pasta similara cu cea pentru chiftele.


 Intr-o tava dreptunghiulara mica asezam felii de bacon pe peretii formei lasand sa atarne cate o bucata de vreo 6 cm pe laturi, ca mai jos:


Asezam pasta de carne peste bacon, o apasam cu o lingura si nivelam frumos.


Dupa ce nivelam frumos carnea, acoperim cu fasiile de bacon care atarnau si avem grija sa fie bine acoperit (daca e nevoie mai punem deasupra niste bacon)


Acoperim forma de chec cu foaie de staniol si o plasam intr-o tava mai mare pe care o umplem cu apa fierbinte ce ajunge pana la jumatatea formei de chec si introducem in cuptorul preincalzit la 170 grade (aveti grija sa nu va ardeti cu apa fierbinte) si lasam timp de 1 ora si 45 minute sa stea la bain marie.


In felul acesta terina nu se va rumeni. Daca vreti sa se rumeneasca putin deasupra, puteti lasa 5 minute fara folie pe pozitia grill. Terina este gata atunci cand bagati o scobitoare in centrul checului si sucurile care ies sunt clare. Cand e gata se scoate cu grija forma din tava si scurgem toata zeama ce s-a format si lasam sa se raceasca putin.


Acoperim tava din nou cu folie si plasam deasupra niste greutati care sa preseze terina. (e bine daca aveti o alta forma de chec similara in care sa puneti niste conserve, sau alte greutati)


Lasam sa se raceasca iar apoi o punem in frigider cu tot cu tava cu conserve, sa se preseze foarte bine. E de preferat ca tava sa stea la frigider cel putin 6 ore, sau peste noapte.
Cand o scoatem din frigider o rasturnam pe un platou si o taiem felii.


Servim cu salata de cruditati, sau cu diverse sosuri dupa preferinte. Merge perfect la micul dejun sau o cina usoara. Bon appetit!


Mai de aproape...Delicios!


English version        

                  In the weekend I was in the mood of cooking, so I tried the Pork terrine wrapped in bacon, inspired by a a recipe that I found in one of my books. Terrine is a forcemeat loaf cooked in the oven that you serve at room temperature. The name "terrine" comes from the ceramic dish in which the loaf is usually made. This time I tried a simple recipe, but I'll definitely try out some other variations of terrine in the future, some with nuts, or liver, etc...Hope you enjoy!
                 
Ingredients:


     1 kg lean ground pork meat 
     bacon strips (I've put like 16)
     2 onions
     4 garlic cloves
     2 eggs
     2 slices of bread
     fresh parsley
     fresh oregano
     salt, pepper


How it's made:

In a large bowl we mix together the ground pork meat, the chopped onion, crushed garlic, the crumbled bread,  eggs, spices, chopped parsley and oregano, obtaining a paste similar to the one that we use to make meatballs. Make sure you use enough salt.
In a rectangular tin, we place the bacon strips on sides nicely, to cover the tin, leaving 6 cm from each strip to hang over the side of the tin, like I did:
We place the meat in the tin and we press it down and we level it.
We cover the meat with the bacon strips nicely, making sure that is fully covered (you can use additional bacon on top if it's necessary).
We place the tin in a bigger pan, we cover it with foil, we pour hot water in the pan half way up of the tin, and We place the pan in the preheated oven at 345 degrees for 1 hour and 45 minutes (the meatloaf will not fry using the bain marie method; if you want it to be golden brown on top, you can use the grill position for 5 minutes at the end) without the foil on the tin.
The terrine is ready when a wooden toothpick inserted in the middle comes clean and the juices are clear.
We remove the pan from the oven and let it cool down a little bit.
Very carefully we remove the tin and we pour the water from the tin in the sink.We put the foil back on the top and we place another tin filled with full cans so the terrine is pressed. We leave it to cool off and we place it in the fridge for at least 6 hours (we leave the heavy tin on top)
We remove it from the fridge and we place it upside down on a plate.
We slice and serve at room temperature with a fresh salad or pickled vegetables, or different sauces.
Bon appetit!


Saturday, March 12, 2011

Chiftelute de pui (Chicken Meatballs)

Share


        Aceste bilute gustoase reprezinta un aperitiv foarte cunoscut si apreciat de catre toata lumea. Pentru a evita carnea de porc, eu am incercat chiftelutele cu carne de pui tocata, fiind mult mai usoare decat cele facute din carne de porc. Noi le-am servit cu garnitura de cartofi taranesti, dar merg foarte bine si cu paste sau piure de cartofi (mai ales pentru cei care aveti copii).
        These small meatballs are a very tasty appetizer, well known and appreciated by all people. Because I wanted to avoid pork meat I've tried out the chicken meatballs, which are a lot lighter than the pork version ones. We served them with country style potatoes, but they also go really well with pasta or mashed potatoes (especially for those of you who have children).

Ingrediente/Ingredients:                                 

 500 g carne tocata de pui/500 g ground chicken
 1 ceapa mica/1 small onion
 2 oua/2 eggs
 1 felie mare de paine/1 slice of bread
 4 catei de usturoi/4 garlic cloves
 patrunjel verde/fresh parsley leaves
 sare, piper/salt, pepper
 ulei pentru prajit/oil for frying


Cum se face/How it's made:

Intr-un bol amestecam carnea de pui, cu ouale, ceapa tocata, usturoiul zdrobit, painea inmuiata in apa, scursa si zdrobita, patrunjelul tocat, sarea si piperul si amestecam foarte bine si adaugam sare dupa gust.
In a large bowl we mix together the meat with eggs, crushed garlic, chopped onion, the soaked bread, drained and smashed, spices and parsley and we mix them all very well.


Cu mainile umezite cu apa, formam bilute mici din compozitia obtinuta de marimea unei nuci (puteti sa le faceti mai mari daca doriti) si le punem pe o farfurie.
With wet hands we form small balls size of walnuts until we finish all the meat mixture and place them on a plate.


Intr-o cratita mica punem ulei iar cand uleiul e incins adaugam bilutele de carne (in mai multe ture) si le lasam sa se scufunde in ulei. Dupa ce incep sa se rumeneasca putin, le intoarcem usor rotind cratita mai mult. Din cauza ca ele sunt acoperite de ulei se vor praji foarte frumos fara a fi nevoie sa le intoarcem cu o lingura.
In a small pot, we heat up oil and fry the meatballs (in a few rounds). When they start to fry we slowly rotate the pot a little bit, so the oil covers them on all sides, and they brown nicely.


Le scoatem pe servet de hartie pentru a absorbi uleiul de pe ele.
We take them out on paper towels to absorb the oil.


Servim cu garnitura de varza, paste sau cartofi, taranesti in cazul meu. Bon appetit!

We serve them with fried cabbage, pasta or potatoes, country style potatoes in our case. Bon appetit!


Related Posts Plugin for WordPress, Blogger...