Monday, February 28, 2011

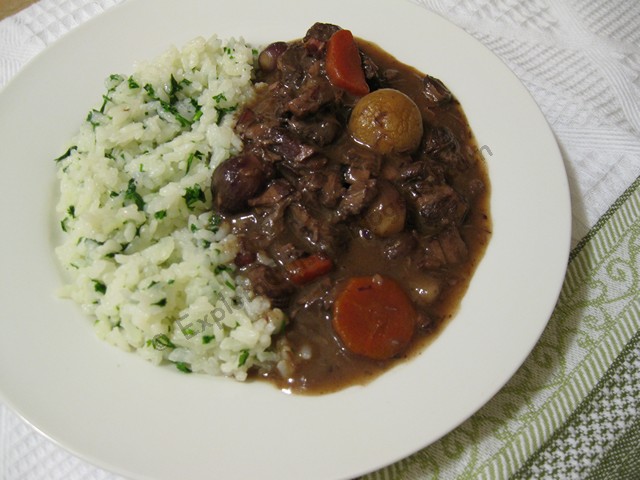
Boeuf Bourguignon

Share


Please scroll down for English version

  
        Pentru ca in cateva ore sarbatorim 1 Martie, ziua martisorului si a inceperii primaverii, m-am gandit sa gatesc ceva bun bun si anume Boeuf Bourguignon (azi am preparat reteta). Am vazut ca multi sunt innebuniti dupa reteta celebra a Juliei Child, asa ca m-am decis sa o prepar si eu chiar daca inca nu am vazut filmul Julie si Julia :)   pentru ca am vrut sa respect ideea retetei, in weekend am fost prin mall si mi-am achizitionat o oala de fonta emailata sau dutch oven cum i se mai spune de la Kitchen Aid. De mult ma tot gandeam sa imi iau una, si acum i-a venit momentul, caci reteta de fata se face perfect in oala mea noua si frumoasa :)
       Un alt motiv pentru care am ales sa prepar aceasta reteta este ca am vrut sa particip la Provocarea Dulce Romanie pentru luna martie, ce presupune prepararea unei retete avand ca ingrediente vinul sau cafeaua, sau chiar amandoua :) Cum Boeuf Bourguignon contine vin din belsug, am ales sa particip si eu. Linkul spre provocarea lunii martie organizata de Carmen de la Bucataria Furnicutilor il aveti aici.

 Despre Boeuf Bourguignon pot spune doar atat : Ce e bun si la Dumnezeu ii place!

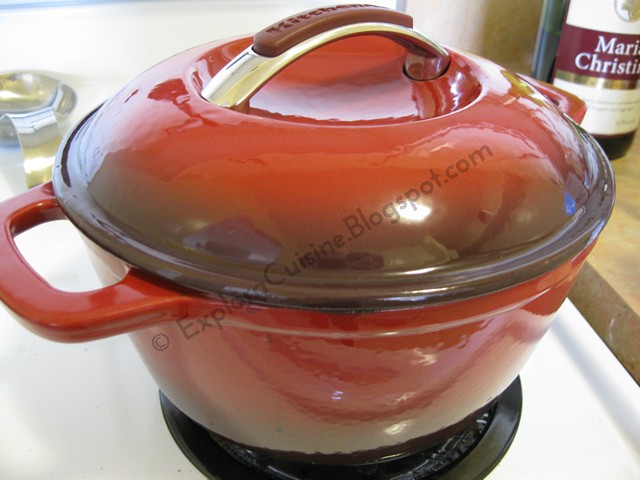
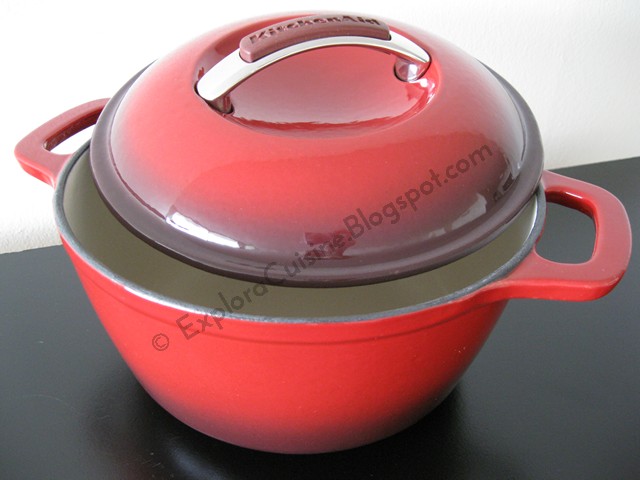
O poza cu dutch oven-ul meu nou :)


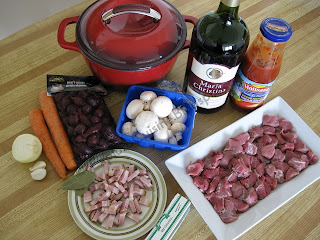
Ingrediente:                                                   

   700 g carne vita (eu am pus vitel)
   100 g bacon
   2 morcovi
   1 ceapa mica
   250 g ciuperci champignon
   20 cepe mici (perlate)
   400 ml vin
   500 ml supa
   2 catei usturoi
   1/2 lingura pasta tomate
   2 linguri faina
   3 linguri ulei
   putin unt pt prajit
   2 frunze dafin, 1/4 lingurita cimbru
   sare, piper


Cum se face:

       Pentru a avea spor la munca creem o atmosfera placuta cu muzica lui Sade si putin vin :) Acesta e vinul pe care l-am folosit azi si pe care il preferam la masa, fiind dulce.


   Incingem cuptorul la 200 grade C.
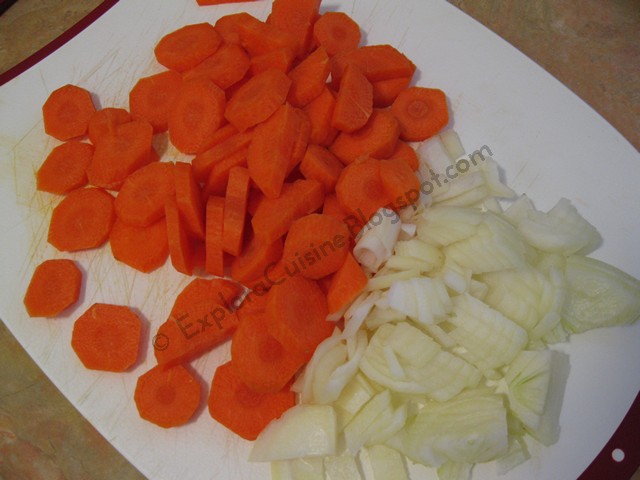
   Mai intai curatam ceapa si morcovii, taiem marunt ceapa, iar morcovii ii feliem.


   Spalam carnea foarte bine, o taiem bucati de marime potrivita si o tapetam cu servete d ehartie, ca sa se absoarbe foarte bine apa, altfel nu se va praji cum trebuie.
   Taiem baconul marunt si il punem in tigaia incinsa cu 1 lingura de unt si 1 lingura de ulei.


 Cand e prajit il scoatem afara cu o spumiera, si punem in locul lui carnea la prajit, pana cand se rumeneste frumos, o scoatem apoi afara si o punem peste bacon.


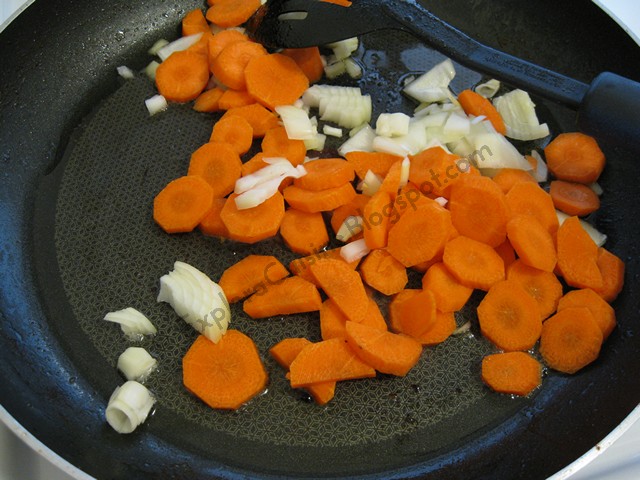
Punem in aceeasi tigaie ceapa si morcovul taiat si sotam putin. Mutam legumele in oala de fonta.


   Cand legumele s-au inmuiat putin adaugam carnea si baconul peste ele si presaram faina si intoarcem carnea pe toate partile, sa se acopere cu faina.


Introducem oala in cuptor pentru 4 minute neacoperita. Dupa 4 minute o scoatem, amestecam bine si adaugam supa, vinul, bulionul, usturoiul, dafinul, cimbrul,  si condimentam cu sare si piper. Micsoram temperatura cuptorului la 150 grade C.


 Punem pe plita si aducem la punctul de fierbere mancarea, punem capacul si introducem in cuptor pe raftul de jos la temperatura mica (la mine 150 grade C sau 310 gr F) cat sa fiarba incet timp de aproximativ 3 ore, acoperita (eu am tinut-o 2,5 ore)


In timp ce carnea fierbe, pregatim cepele micute si ciupercile.


  Curatam de coaja ceapa si ciupercile, le spalam si le uscam foarte bine (daca ciupercile sunt mari, le puteti taia in 2)


  Intr-o tigaie punem ulei si prajim ciupercile pana se rumenesc putin. Le scoatem pe o farfurie.


  Intr-o alta tigaie punem ulei si prajim cepele pana se rumenesc si ele frumos.


  Cand carnea mai are 15 minute de fiert, punem cepele si ciupercile in oala cu carne si lasam sa fiarba la cuptor inca putin.


    Dupa 15 minute, carnea este moale, legumele sunt minunate, iar mirosul, mirosul din casa e extraordinar!  Daca doriti un sos mai gros decat e, puteti adauga o lingura de faina frecata cu putina apa la mancare si mai fierbeti pe plita inca vreo 3 minute pana se ingroasa.
    Lasam sa se raceasca putin si servim cu garnitura de cartofi, paste sau orez cu patrunjel verde in cazul meu. Bon appetit!!!


Pentru reteta m-am inspirat de la Silvia, doar ca am modificat unele lucruri.


English version


      Because we celebrate  March 1st in a few hours, the day and commencement of spring, I thought I should cook something really good: Beef Bourguignon (I prepared the recipe today). I saw that many people talk about the famous Julia Child's recipe, so I decided to prepare it too, even though I have not seen the movie Julie and Julia :) . I wanted to respect the idea of formula, so in the weekend I went  to the  mall and I bought an enameled cast iron pot or Dutch oven as it is called from Kitchen Aid. I wanted to buy one long time ago, and now its time came because the recipe is perfect to be cooked in my new and beautiful dutch oven :)
      I chose to prepare this recipe now because I want to participate with it at the challenge called Dulcea Romanie, the March challenge, which has 2 ingredients: coffee and wine, and since Beef Bourguignon has plenty of wine, I found it perfect for the challenge. More details about the challenge that Carmen from Bucataria Furnicutilor is organising you can find here.


 About Beef Bourguignon I can only say this: What is good even God loves it!

A picture with my new Dutch oven :)

Ingredients:

700 g beef meat (I put calf)
100 g bacon
2 carrots
1 small onion
250 champignon mushrooms
20 small onions (pearl)
400 ml wine
500 ml broth
2 garlic cloves 
1/2 tablespoon tomato paste
2 tablespoons flour
3 tablespoons oil
some butter for frying
2 bay leaves, 1/4  teaspoon thyme
salt, pepper


How it's made: 

    We make a pleasant atmosphere to work with Sade's music and wine :) This is the wine that I used today and which we prefer for dinner, because it's sweet.
    
We preheat the oven at 400 degrees.
 First clean the onions and carrots, finely cut onions, and slice the carrots.

Wash the meat very well, cut it in smaller pieces and absorb the water with paper towels, or else it will not fry properly.
Cut bacon into small pieces and put it in hot skillet with 1 tablespoon butter and 1 tablespoon of oil.

When it is fried take it out with a spoon and put it aside. In the same pan fry the meat until browned beautifully, and then take it out and place it next to the bacon.

Put onion and carrots in same skillet and saute them. We move the fried vegetables in the cast iron pot. When vegetables have softened slightly add the meat and bacon over them and sprinkle with flour and turn the meat on all sides, to cover with flour.

We placethe pot in the oven uncovered for 4 minutes. After four minutes we take it out, mix well and add broth, wine, broth, crushed garlic, bay leaves, thyme, and we season with salt and pepper. We change the oven temperature to 310 degrees.

Put the pot on stove and bring to a boil, we cover with the lid and we place the dutch oven on the bottom shelf in the oven at low temperature, and we let it simmer slowly for about 3 hours, covered (I kept a 2.5 hours).

While meat is boiling, we prepare the pearl onions and mushrooms.

Peel the onions and mushrooms, wash them and dry them very well with paper towels (if the mushrooms are large, you can cut them in 2)

Put oil in a pan and fry the mushrooms until slightly browned. We take them out on a plate.
We do the same with the mushrooms.

When meat is almost finished, put onions and mushrooms in the pot and place it back in the oven and let it simmer a bit more.(15 minutes)

After 15 minutes, the meat is soft, the vegetables are wonderful, and the smell, the smell in the house is great!   If you want a thicker sauce than it is, add one tablespoon of flour rubbed with a little more water and boil on the stove for about another 3 minutes until thickened.

We leave it to cool slightly and serve with potatoes, pasta or rice with parsley in my case. Bon appetit!!!
Paine alba simpla - reteta pas cu pas (Simple White Bread - Step by Step Recipe)

Share


Please scroll down for English version


         Din categoria "How it's made" cred ca trebuie sa faca parte si o reteta de paine alba simpla. La mine in familie nu se facea prea des paine de casa, asa ca dupa ce am venit in Canada am cautat pe internet retete de paine pana m-am lamurit care e procesul de preparare. Credeam ca e o povara sa faci paine, ca dureaza mult si e dificil, dar dupa ce am facut-o pe prima, nu am mai cumparat paine decat foarte rar si de aceea m-am gandit ca o reteta cu poze pas cu pas pentru paine, ar face sa fie mai putin "scarry" prepararea ei (ma refer desigur la cei care nu au masina de facut paine, pentru ei e mult mai simplu :). Sper sa va ajute pozele!


Ingrediente pt 1 paine:                                      

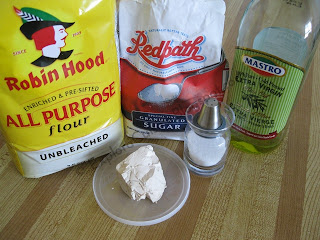
  1.     500 g faina alba de buna calitate (eu aici  cumpar Robin Hood, e cea mai buna)
  2.     25 g drojdie proaspata (sau uscata dupa caz, eu cumpar la pachet de la o brutarie)
  3.     300 ml apa
  4.     1/2 lingurita zahar
  5.     3 linguri ulei 
  6.     1/2 lingurita sare
   

Eu fac de obicei cate 2 paini odata, si de aceea pozele arata o cantitate mai mare de aluat si 2 tavi in loc de una.
Este bine ca drojdia sa fie la temperatura camerei.

Cum se face:

        Mai intai preparam maiaua:  intr-un bol mic punem drojdia zdrobita, zaharul si 300 ml apa calduta (nu fierbinte!) si o lingura de faina.
 Amestecam bine, punem un stergar deasupra peste bol si lasam vreo 15 minute pana cand maiaua isi dubleza volumul.   daca drojdia este proaspata si de buna calitate, maiaua va creste frumos, in cazul in care nu creste, nu va mai obositi sa continuati, pentru ca nu va creste painea).
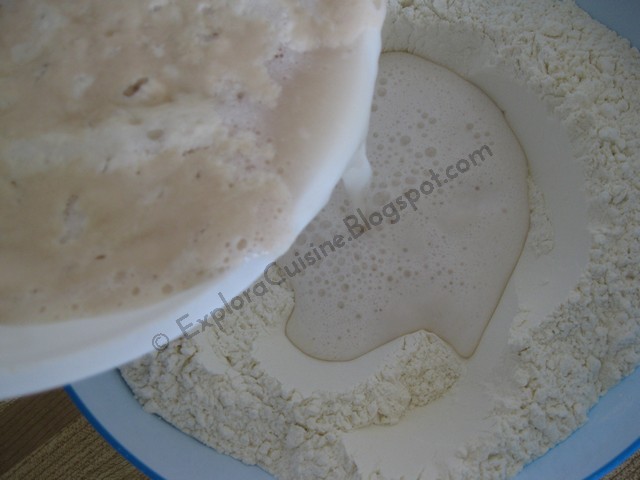
       Intre timp, cantarim si cernem faina (cea pe care o folosesc eu e deja cernuta), o punem intr-un vas mai adanc, adaugam sarea si amestecam bine (am citit undeva ca nu e bine ca sarea sa intre in contact cu drojdia) si facem o groapa in mijloc.  Maiaua a crescut...


Adaugam maiaua in faina din bol.


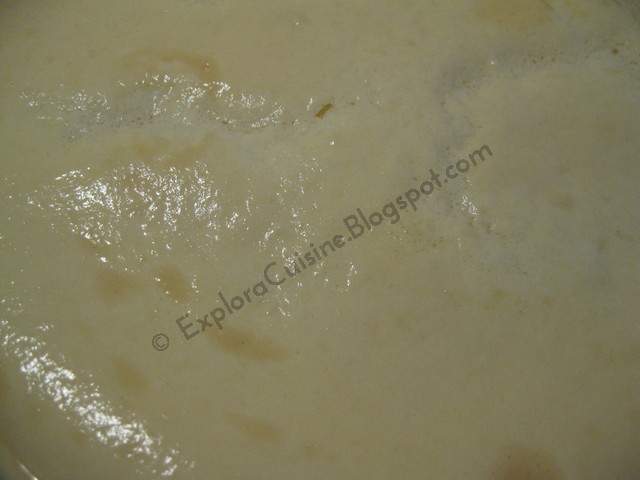
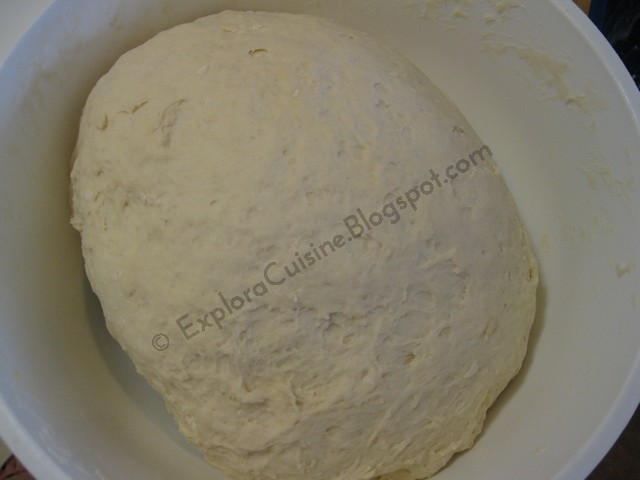
Incepem sa framantam, adaugam uleiul si framantam pana cand aluatul se ia de pe peretii vasului. Eu nu framant decat pana se inglobeaza toata faina.
 Trebuie sa arate asa:


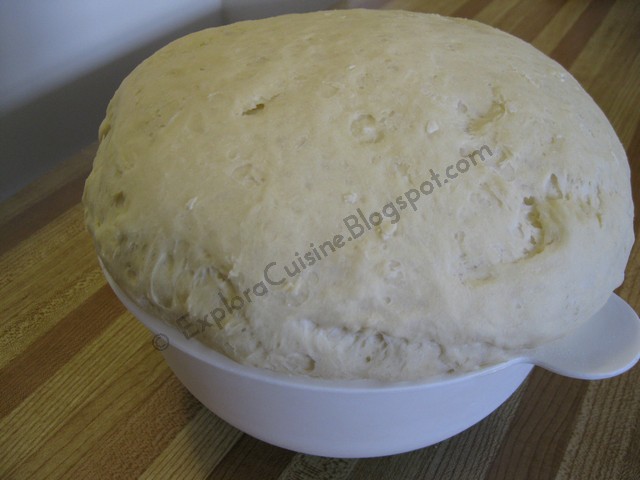
 Acoperim cu un stergar vasul si il punem intr-un loc caldut, ferit de curent.(unii sugereaza sa incalziti cuptorul si sa puneti inauntru aluatul, eu din experienta va spun ca aluatul se va intari de la caldura deasupra). Lasati aluatul sa creasca aproximativ 1,5 ore. Dupa ce a crescut frumos...


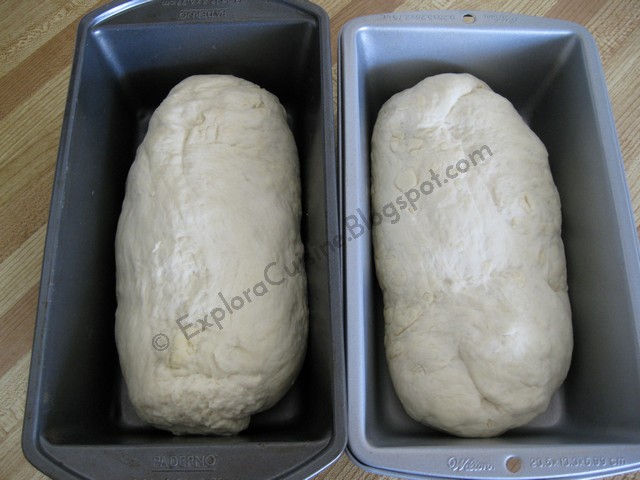
Pregatim 1 tava (eu folosesc de chec, imi place painea in forma de franzela, dar puteti sa folositi orice tava doriti, depinde de forma pe care vreti sa i-o dati). Scoatem aluatul din bol, si il framantam 1 secunda, si ii dam forma dorita. Il asezam in tava. Preincalzim cuptorul la 195 grade Celsius sau 390 grade F).


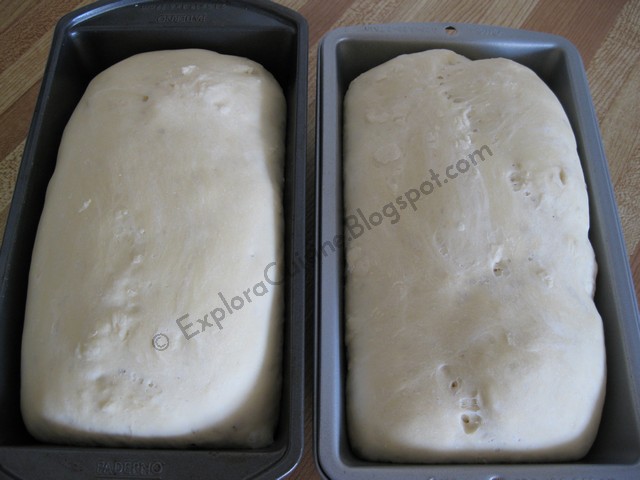
Lasam sa creasca inca vreo 30-45 minute, pana cand ajunge sa depaseasca putin tava (acoperim cu stergar tava). Mie imi place painea nu foarte inalta, asa ca nu o las sa creasca exagerat. Dupa 40 min..


Facem usor niste taieturi cu cutitul pentru model fara a apasa aluatul. Eu nu ung cu nimic deasupra painea, iasa foarte frumoasa asa. Dam la cuptorul incins la 390 gr F timp de 40 minute. Mirosul din casa devine ucigator :))


Dupa 40 minute, scoatem painea pe un gratar si lasam sa se raceasca.


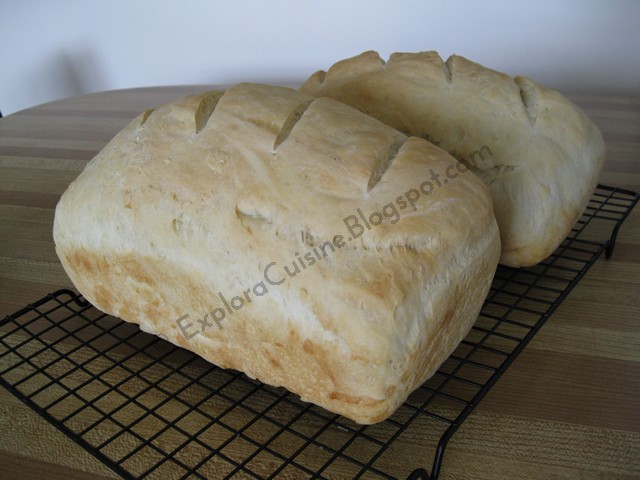
Observati ca una e mai mica si una mai mare :))) niciodata nu reusesc sa modelez in mod egal fiecare paine :)  Dupa ce s-a racit, puteti taia felii, yummy!!!

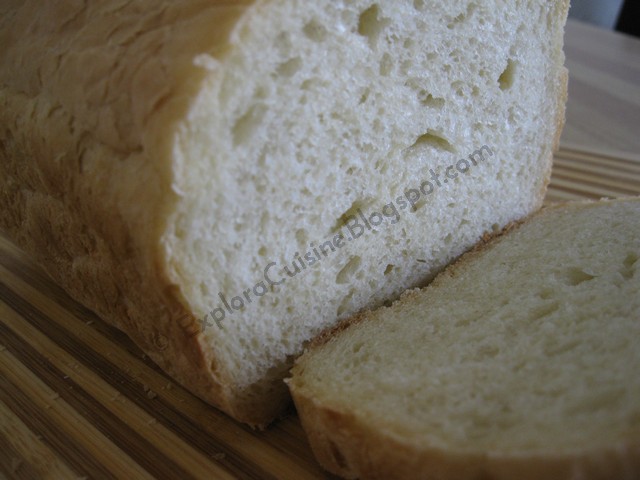
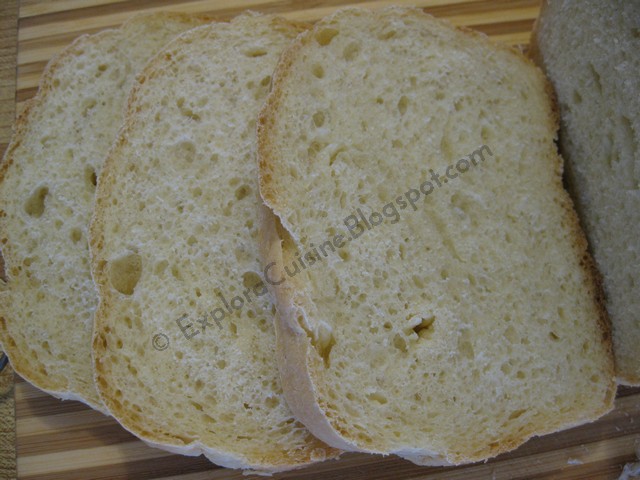
 Si ca sa vedeti cat e de pufoasa...Voila!


  Nu sa-mi laud singura marfa, dar e perfecta!!! pufoasa si aromata, cu o crusta delicioasa! Sper sa va placa painea, caci e tare buna si merge cu orice!

 English version


     In the category "How to"  I believe a simple white bread recipe must be included. In my family bread wasn't made very often, so when I came to Canada I searched the Internet for bread recipes until I figure it out how to do it. I thought it was a burden to make bread, that it takes a lot of time and it's difficult, but after I did my first one, I havn't bought bread but on very rare occasions and so I thought a step by step recipe for bread with pictures would make it less "scary" preparing it (I refer of course to those who don't have a bread machine at home :). I hope the pictures will help!

 Ingredients: 

  1.     500 g white flour of a good quality (I buy Robin Hood flour, it's the best)
  2.     25 g fresh yeast (or dry if it's the case, I buy it from a bakery shop in a bigger package)
  3.     300 ml warm water
  4.     1/2 teaspoon sugar
  5.     3 tablespoons oil (olive oil or sunflower oil)
  6.     1/2 teaspoon salt

I usually make 2 breads at a time, and that's why the pictures show more dough quantity and 2 pans instead of one.
It's best if you use the yeast at room temperature.

 
How it's made:

   We First prepare the yeast mixture: in a small bowl crumble the yeast, add the sugar and 300 ml warm water (not hot) and 1 tablespoon of flour.
   Mix well, put a towel over the bowl and leave it for about 15 minutes until yeast doubles its volume. If the yeast is fresh and a good quality one, the yeast mixture will grow nicely( if it doesn't  increase, don't bother to continue).
   Meanwhile, weigh and sift flour (I use one that is already pre-sifted), put it in a deep and large enough  bowl, add salt and mix well (I read somewhere that salt is not good when it comes in contact with the yeast) and make a hole in the middle. The yeast increased its volume ...
   We add the yeast in the bowl where the flour is. We add the oil.
   We knead the bread until it all comes together. We can sprinkle some flour if it gets to sticky.
   It should look like this:
   We cover the dough with a clean kitchen towel and we place the bowl in a warm place, faraway from cold air.(some people suggest that we should put the bowl in the preheated oven, but from my experience I can tell you that it will make the dough hard on the surface). Let the dough sit until it doubles it's volume, for 1,5 hours. When finished...
   We prepare a pan (I usually use a loaf pan, because I like the bread to have the shape of a loaf, but you can use any kind of pan that you like, depending on the shape you want it to have). We knead the dough for a second, and we give it the shape we want, we place it in the pan.
   We preheat the oven at 390 degrees.
   We let the dough rise again for 30-45 minutes, until it reaches the top of the pan (we cover it with the kitchen towel). I don't like the bread very tall, so I don't let it rise to much. After 40 minutes...
   Using a sharp knife, we make 3 or 4 cuts on the bread gently and without pressing the dough. I don't oil the bread at all, because it will come out nicely without anything. We place the pan in the oven for 40 minutes at 390 degrees.  The smell in the house is a killing one :))
  After 40 minutes, we take the bread from the oven, and we place the bread on a rack to cool down.
  You can see that one is bigger and one is smaller, because I can never make them equal from the start :)).  After it cooled down, we can slice it. Yummy!
   So you can see how beautiful it is...
   It has a beautiful flavor and it's very easy to make, I hope you try  it!

Saturday, February 26, 2011

Cheesecake cu capsuni (Strawberry Cheesecake)

Share


Please scroll down for English version


          Imi plac cheesecake-urile tare mult, dar pentru ca sunt super calorice incerc sa le evit pe cat posibil, si cand mi-e foarte pofta cumpar unul de la Sara Lee (il ador pe cel cu cirese). De Valentines Day insa am facut propriul cheesecake, inspirandu-ma cate putin de la Edith, pentru ca vroiam un cheesecake fara coacere. A iesit un desert delicios pe care cu siguranta il voi repeta, mai ales ca vine 1 Martie curand :)


Ingrediente:

   220 g biscuiti graham
   100 g unt
   6 linguri lapte
   500 g crema de branza (Philadelphia aveam)
   70 g zahar pudra
   250 ml frisca batuta
   !! va recomand si putina gelatina pentru crema (eu am respectat reteta de data aceasta)

Pt sos de capsuni:

   400 gr capsuni proaspete
   5 linguri zahar


Observatie:    Trebuie sa precizez ca desi a fost delicios ca si gust (sotul meu l-a laudat intruna), cheesecake-ul meu a ramas destul de moale si dupa 6 ore de stat in frigider, asa ca recomand calduros sa utilizati gelatina in crema, pentru a fi ferma cand taiati.

Cum se face:

    Maruntim biscuitii cu mana sau cu un robot preferabil, ii punem intr-un bol, adaugam untul topit, si cele 6 linguri de lapte (ca si observatie, la mine a iesit putin mai moale decat trebuia).


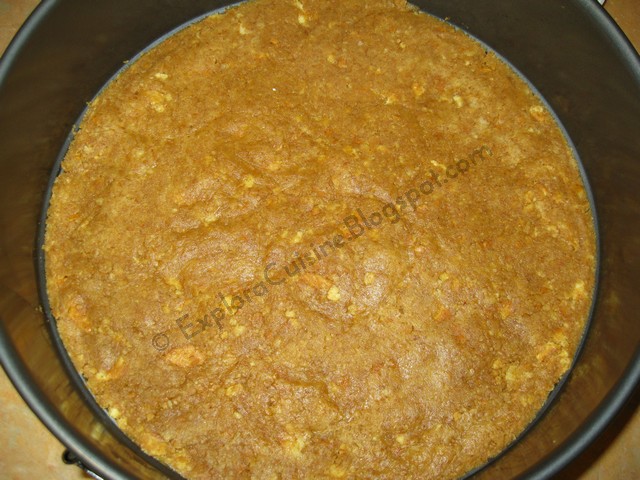
Intr-o tava cu pereti detasabili, presam cu o lingura biscuitii in interiorul tavii (ar fi bine sa puneti in loc de fundul detasabil un platou, ca sa fie mai usor de servit, eu m-am grabit).


Dam tava la frigider pentru minim 30 minute.  Intre timp ne ocupam de crema.
Batem crema de branza (la temperatura camerei) cu zaharul pudra timp de 1-2 minute.

Apoi amestecam crema de branza cu frisca batuta foarte bine.


Va rezulta o crema spumoasa si fina, dar putin prea moale dupa parerea mea, in care va recomand sa puneti si putina gelatina, sa ajute la fermitate (eu am respectat reteta exact de data aceasta).


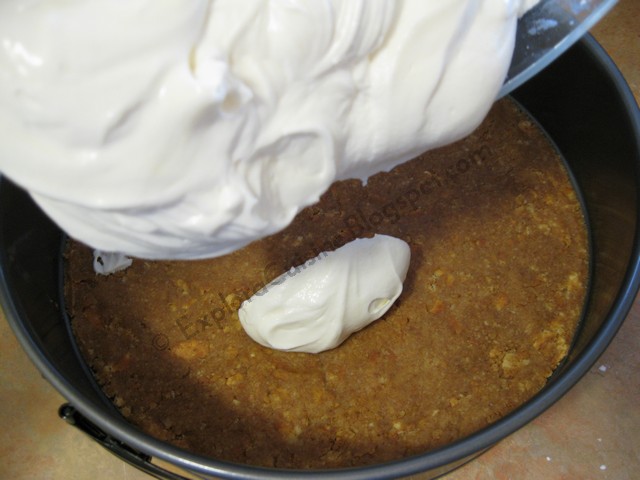
Scoatem tava din frigider, si asezam crema de branza peste biscuiti.


Dam la frigider pentru aproximativ 2 ore (sau pana cand e rece complet).
 Intre timp ne ocupam de sos. Spalam si taiem capsunile in bucati mai mari.


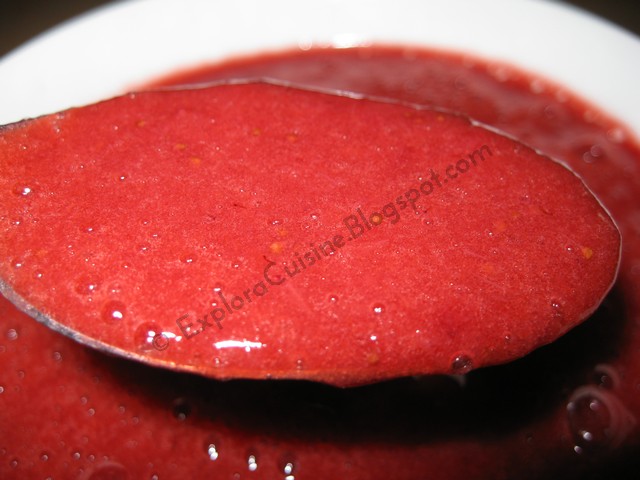
Punem capsunile si zaharul intr-un vas pe foc si lasam sa fiarba la foc mic timp de cca 25 minute (pana cand se ingroasa si devine ca o dulceata). Lasam sa se raceasca putin si apoi mixam cu un robot vertical, pentru a obtine o pasta. Daca vreti sa fie teapan, sugerez sa adaugati putina gelatina si in sos.


Cand crema este complet rece la fel ca sosul de capsuni, punem sosul peste crema.


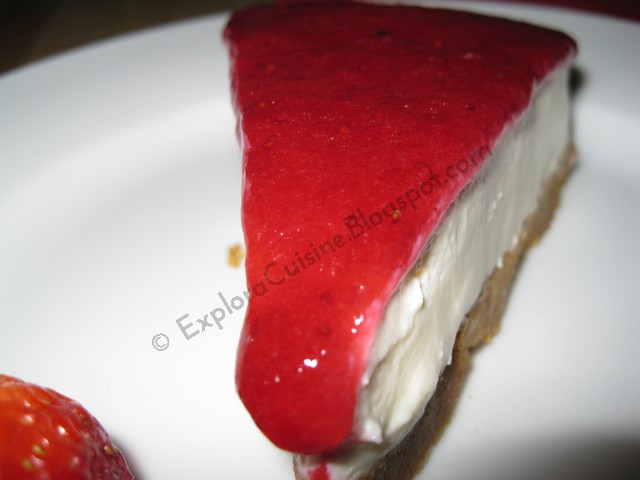
Dam tava la frigider pentru 5 ore sau peste noapte. Eu l-am congelat dupa acest timp, ca nu il puteam taia bine.  Si o poza cu o felie sanatoasa :)   Bon appetit!


English version


     I love cheesecakes very much, but because of the amount of calories they have, I try to avoid them as much as possible, and when I'm really craving I just buy one from Sara Lee (I adore thecherry cheesecake).  On Valentines Day though, I did my own cheesecake, inspired by one of Edith's recipes, because I wanted a cheesecake without baking. It came out delicious and I'll definitelyrepeat it, especially since March 1st comes soon:)


Ingredients: 

    220 g Graham crackers
    100 g butter 
    6 tablespoons milk
    500 g cheese cream (I had Philadelphia )
    70 g powdered sugar
    250 ml whipped cream
! I recommend some gelatin for the cream (I followed the recipe this time)

For the strawberry sauce:

   400 g fresh strawberries
   5 tablespoons sugar


Observation:  

      I have to say that although the taste of the dessert was awesome (my husband loved this dessert), my cheesecake has remained soft state even after 6 hours in the fridge, so I highly recommend to usegelatin in the cream, to be firm when cut.

How it's made:

      We  crumble biscuits by hand or preferably using a robot, we place them in a bowl, we add melted butter, and the 6 tablespoons of milk (as well as observation, to me it went a little softer than it should).
      In a pan with removable walls, press the crackers with a spoon (you should place a removable bottom plate, to be easier to serve, I was in a rush).
      We place the pan in the fridge and refrigerate for at least 30 minutes. Meanwhile we make the cream.
     We beat the cheese cream (at room temperature) with the powdered sugar for 1-2 minutes.
     Then  we mix the cheese cream with the whipped cream.
     We get a foamy cream, but a little too soft in my opinion, I recommend you put a little gelatin in it (I followed the recipe exactly this time).
     We remove the pan from the refrigerator, and place cheese cream above crackers.
     We place it again in the refrigerator for about 2 hours (or until it is completely cold).
     Meanwhile we prepare the sauce. Wash and cut strawberries in larger pieces.
     Put strawberries and sugar in a pot and let it simmer on low heat for about 25 minutes (until it thickens and becomes like a jam). We leave it to cool slightly and then we mix it with a robot to get a paste. If you want it to be firm, I suggest you add a little gelatin in it.
     When the cream cheese is completely cold and the strawberry sauce as well, we place the sauce over the cream.
     Refrigerate for 5 hours or overnight. I've frozen it after that because I could not cut it well. And a picture of a big slice :)     Bon appetit!

Thursday, February 24, 2011

Pui umplut la cuptor (Roast Stuffed Chicken)

Share


Please scroll down for English version


        Am vazut ca toata lumea a facut cel putin o data pui la cuptor, asa ca m-am hotarat sa incerc si eu. Dupa ce am dat search pe net am gasit o multime de variante de a-l prepara, din care am ales sa fac puiul umplut cu ciuperci de data aceasta. A iesit o friptura foarte aromata si suculenta spre surprinderea mea :) Si pana la urma, nu a fost atat de greu pe cum m-am asteptat, asa ca voi mai incerca si alte variante de a-l pregati pe viitor. Imi cer scuze pentru poze, dar fiind seara cand am terminat, nu am reusit sa surprind prea multe cadre cu puiul gata facut, nu mai zic ca lesinam de pofta :))


Ingrediente:                                                 

      1 pui pentru cuptor (1-1,5 kg)
      5-6 cartofi medii
      1 ceapa rosie
      250 g ciuperci champignon
      3 morcovi
      3 rosii mici
      5 catei usturoi
      1/2 lamaie
      150 g unt
      condimente (sare, piper, arome)


Cum se face:


      Mai intai spalam puiul foarte bine pe dinauntru si pe dinafara (mentionez ca puiul meu era deja pregatit pt cuptor, adica nu avea maruntaie inauntru sau alte chestii, ceea ce mi-a usurat viata :)) ). Tapetam cu hartie interiorul si exteriorul pentru a absorbi toata apa, il condimentam cu sare si piper peste tot si il punem deoparte pana pregatim legumele.
     Spalam legumele si curatim de coaja morcovii, cartofii, ceapa, usturoiul si ciupercile. Taiem cartofii sferturi, iar morcovii si ceapa bucati mai mari.


  Taiem ciupercile in bucati mai mari si le introducem impreuna cu usturoiul si lamaia in cavitatea puiului.

 
Coasem apoi puiul, il legam si il ungem cu o pensula peste tot cu unt si il punem deoparte.


Ungem o tava incapatoare cu unt si asezam legumele curatate (cartofii, morcovii, rosiile, ceapa), le condimentam cu sare, piper si oregano, iar in mijlocul lor asezam puiul.


 Asezam tava in cuptorul preincalzit la 190 grade si dam la cuptor timp de 1, 5 ore. Eu nu am pus folie deasupra si a iesit destul de suculent. Cand carnea este moale, iar puiul e prajit deasupra il scoatem din cuptor (puiul e facut atunci cand intepati cu o furculita carnea si lichidul e transparent nu rosiatic).


Nu scoatem puiul imediat din tava ci il acoperim cu o folie si il lasam asa inca 15 minute (astfel isi va pastra suculenta). 
Punem puiul pe un platou, taiem ata cu care l-am cusut si scoatem ciupercile.

Si o poza nu foarte reusita cu puiul in farfurie...Bon appetit!


       Ca observatii vreau sa mentionez ca nu mi-a placut aroma de lamaie, mi-ar fi placut mai mult oregano  pentru o aroma mai puternica, iar usturoiul puteam sa il mixez cu unt si condimente si sa il ung pe pui. Desigur, acestea sunt remarcile mele, fiecare are alte preferinte :)


English version


        I saw that everyone had at least once prepared a roasted chicken, so I decided to try it myself.After I did a search on the internet, I found many ways of cooking it, so I chose to make roast chicken stuffed with mushrooms this time. The chicken came out very flavorful and juicy to my surprise:) And after all, it wasn't as hard as I expected, so I will try other versions of preparing it in the future. I apologize for the pictures, but being in the evening when we finished, I did not capture toomany ready-made chicken frames, not to mention that the smell in my house was killing me :))


Ingredients: 

      1 chicken for roast (1-1,5 kg)
      5-6 medium potatoes
      1 red onion
      250 g champignon mushrooms
      3 carrots
      3 cherry tomatoes
      5 garlic cloves
      1/2 lemon
      150 g butter (at room temperature)
      spices (salt, pepper, flavors)


How it's made:

     First we wash the chicken very well inside and out (have to mention that my chicken was already prepared for the oven, meaning it didn't have  anything inside, which really made my life easy:))). Tap the chicken with paper towels inside and outside, season with salt and pepper all over and put it aside until we cut the vegetables.
     Peel and wash vegetables( carrots, potatoes, onions, garlic and mushrooms). Cut potatoes in quarters, carrots and onions into larger pieces.
     We cut the mushrooms in half or quarters, and we place them inside the chicken, adding the lemon and the garlic cloves.
     We tie up the chicken and we brush it all over with butter. We put it aside.
     We butter a roasting pan and we place the vegetables (potatoes, carrots, tomatoes, onions), spice them with salt, pepper and oregano, and we add the chicken in the middle of the pan. 
     We place the tray in the preheated oven at 390 degrees for 1, 5 hours. I did not put foil on top and the chicken came out quite juicy. When the meat is tender and the chicken is golden brown we take it out of the oven (the chicken is done when pierced with a meat fork the liquid is transparent).
     Do not serve the chicken immediately, first you cover it with foil and leave it another 15 minutes (so it will remain juicy).
     Put the chicken on a platter, cut the thread and take out the mushroom stuffing.

   And a not very successful picture with the chicken... Bon appetit !

   As an observation, I have to mention that I didn't liked the lemon flavor, I would have liked more oregano, and I could have mixed the garlic with butter and spices and brushed it on the chicken. Of course, these are my remarks, everybody has different preferences :)
Related Posts Plugin for WordPress, Blogger...